Hyundai Palisade (LX2): Cylinder Block / Drive Plate
Repair procedures
| Removal and Installation |
|

| 1. |
Remove the automatic transaxle.
(Refer to Automatic Transaxle System - "Automatic Transaxle")
|
| 2. |
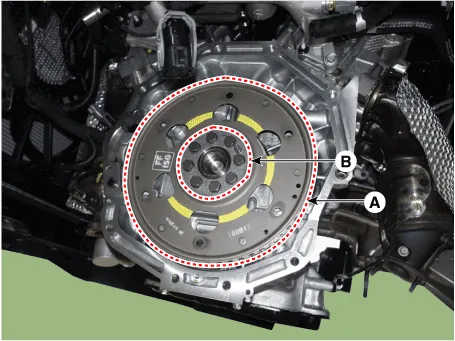
Remove the adapter plate (B) and the drive plate (A).
|
| 3. |
Install in the reverse order of removal.
|
Repair procedures Removal • Be careful not to damage the parts located under the vehicle (floor under cover, fuel filter, fuel tank and canister) when raising the vehicle using the lift.
Repair procedures Replacement • Be careful not to damage the parts located under the vehicle (floor under cover, fuel filter, fuel tank and canister) when raising the vehicle using the lift.
Other information:
Hyundai Palisade (LX2) 2020-2026 Service Manual: Immobilizer Control Unit
Repair procedures Removal 1. Disconnect the negative (-) battery terminal. 2. Remove the glove box housing. (Refer to Body - "Glove Box Housing Cover") 3.
Hyundai Palisade (LX2) 2020-2026 Service Manual: Warning Indicator
Components and components location Components 1. Warning indicator 2. SVM camera Repair procedures Removal 1. Disconnect the negative (-) battery terminal. 2.
Categories
- Manuals Home
- Hyundai Palisade Owners Manual
- Hyundai Palisade Service Manual
- Power Outlet
- General Tightening Torque Table
- Scheduled maintenance services
- New on site
- Most important about car
