Hyundai Palisade (LX2): Cylinder Block / Rear Oil Seal
Repair procedures
| Replacement |
|

| 1. |
Remove the transaxle assembly.
(Refer to Automatic Transaxle System - "Automatic Transaxle")
|
| 2. |
Remove the drive plate.
(Refer to Cylinder Block - "Drive Plate")
|
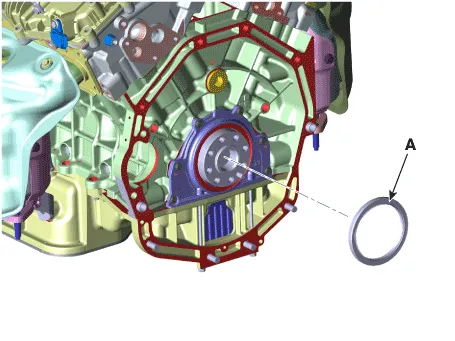
| 3. |
Remove the rear oil seal (A).
|
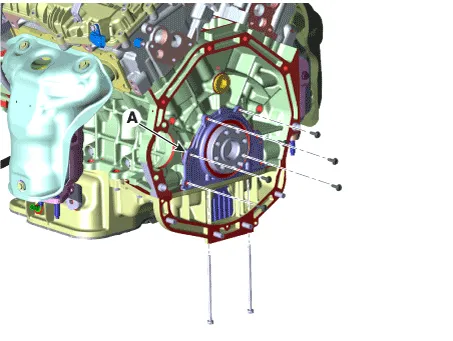
| 4. |
Remove the rear oil seal case (A).
|

| Installation |
| 1. |
Install the rear oil seal case (A).
|


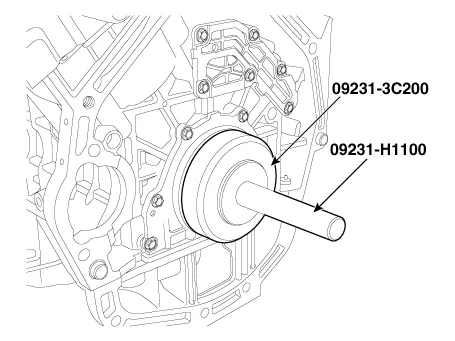
| 2. |
Using SSTs (09231-3C200, 09231-H1100), install the rear oil seal.
|

| 3. |
Install the remaining parts in the reverse order of removal.
|
Repair procedures Removal and Installation • Be careful not to damage the parts located under the vehicle (floor under cover, fuel filter, fuel tank and canister) when raising the vehicle using the lift.
Repair procedures Disassembly • Be careful not to damage the parts located under the vehicle (floor under cover, fuel filter, fuel tank and canister) when raising the vehicle using the lift.
Other information:
Hyundai Palisade (LX2) 2020-2026 Service Manual: Specification
Hyundai Palisade (LX2) 2020-2026 Service Manual: Rear Corner Safety ON/OFF Switch
Components and components location Circuit Diagram Repair procedures Inspection 1. Disconnect the negative (-) battery terminal. 2. Remove the crash pad lower panel. (Refer to Body - "Crashpad Lower Panel") 3.
Categories
- Manuals Home
- Hyundai Palisade Owners Manual
- Hyundai Palisade Service Manual
- Components and components location
- Convenient Features of Your Vehicle
- Rain Sensor
- New on site
- Most important about car
