Hyundai Palisade (LX2): Body Side Molding / Side Sill Molding
Repair procedures
| Replacement |
|

|

| 1. |
Remove the rear wheel guard
(Refer to Body Side Molding - "Rear wheel guard")
|
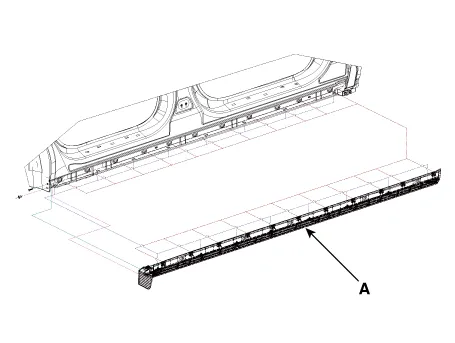
| 2. |
Using a flat-tip screwdriver or remover and remove the side sill molding
(A).
|
| 3. |
To install, reverse removal procedure.
|

Repair procedures Replacement • When removing with a flat-tip screwdriver or remover, wrap protective tape around the tools to prevent damage to components.
Repair procedures Replacement • When removing with a flat-tip screwdriver or remover, wrap protective tape around the tools to prevent damage to components.
Other information:
Hyundai Palisade (LX2) 2020-2026 Service Manual: Rear Heater Unit
Components and components location Component Location 1. Rear Heater & A/C Unit Repair procedures Replacement • Be careful not to damage the parts located under the vehicle
Hyundai Palisade (LX2) 2020-2026 Service Manual: Parking/View Switch
Repair procedures Removal 1. Disconnect the negative (-) battery terminal. 2. Remove the floor console upper cover. (Refer to Body - "Floor Console Assembly") 3.
Categories
- Manuals Home
- Hyundai Palisade Owners Manual
- Hyundai Palisade Service Manual
- Lift and Support Points
- How to reset the power liftgate
- Maintenance
- New on site
- Most important about car
