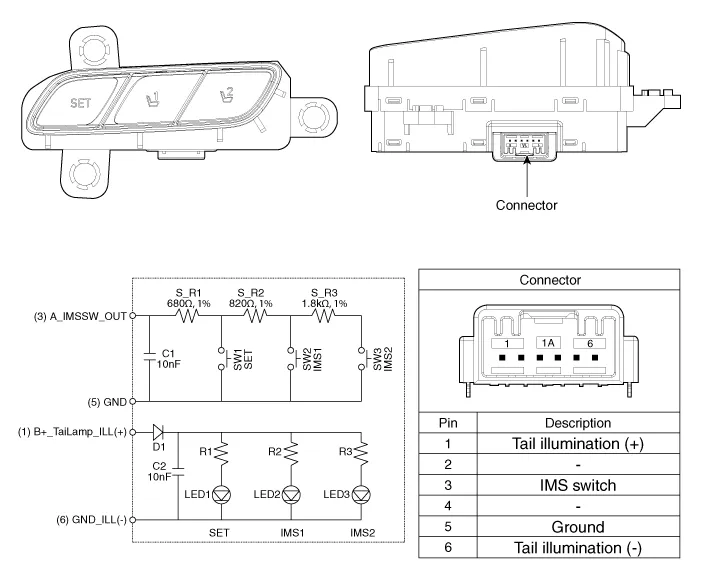
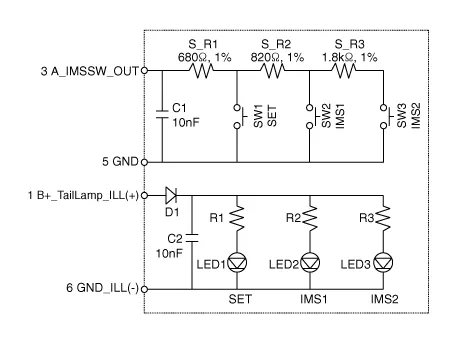
Hyundai Palisade (LX2): Integrated Body Control Unit (IBU) / IMS Control Switch
Components and components location
| Components |
Repair procedures
| Inspection |
| 1. |
Disconnect the IMS control switch connector.
|
| 2. |
With the power IMS control switch in each position, make sure that continuity
exists between the terminals below. If continuity is not as specified,
replace the IMS control switch.
|
| Removal |
| 1. |
Disconnect the negative (-) battery terminal.
|
| 2. |
Remove the front door trim.
(Refer to Body - "Front Door Trim")
|
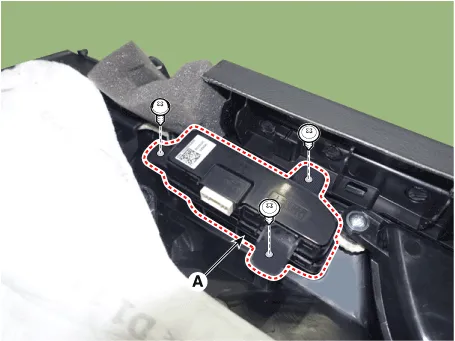
| 3. |
Disconnect the IMS switch connector (A) and then remove the IMS switch
(A).
|

| Installation |
|

| 1. |
Connect the connectors and reassemble the IMS control switch.
|
| 2. |
Reassemble the front door trim.
|
| 3. |
Connect the negative (-) battery terminal.
|
Components and components location Components IMS input/output pin information No Connector A Connector B Connector C 1 Cushion extension moter (Front) B+ (Power) Seat slide motor switch (Front) 2 Seat recline motor (Front) Ground (Power) Seat recline switch (Front) 3 Seat height motor (Up) B+ (Power) Seat tilt switch (Up) 4 Seat slide motor(Front) - Seat height switch (Up) 5 Seat Cushion extension moter (Rear) Ground Seat cushion extension switch (Front) 6 Seat recline motor (Rear) B_CAN (High) 7 Seat tilt motor (Up) B_CAN (Low) 8 Seat tilt motor (Down) Lumber motor (Up) 9 Seat height motor (Down) Lumber motor (Down) 10 Seat slide motor (Rear) Seat slide sensor 11 Seat tilt sensor 12 - 13 Seat position sensor power 14 IGN 1 15 Seat slide switch (Rear) 16 Seat recline switch (Rear) 17 Seat tilt switch (Down) 18 Seat height switch (Down) 19 Seat cushion extension switch (Rear) 20 Ground 21 Lumber motor (Low) 22 IMS switch 2 23 - 24 Seat recline sensor 25 Seat height sensor 26 - 27 - 28 Battery (+) Repair procedures Removal 1.
Other information:
Hyundai Palisade (LX2) 2020-2026 Service Manual: Photo Sensor
Description and operation Description The photo sensor is located at the center of the defrost nozzles. The photo sensor contains a photovoltaic (sensitive to sunlight) diode. The solar radiation received by its light receiving portion, generates an electromotive force in proportion to the amount of radiation received wh
Hyundai Palisade (LX2) 2020-2026 Service Manual: Repair procedures
Removal SVM Rear Camera • In case of bad quality or poor focus, be sure to check the camera lense surface condition and foreign materials.
Categories
- Manuals Home
- Hyundai Palisade Owners Manual
- Hyundai Palisade Service Manual
- Automatic Transaxle Fluid (ATF)
- Body Electrical System
- Rain Sensor
- New on site
- Most important about car
