Hyundai Palisade (LX2): Air conditioning System / Auto Defogging Sensor
Hyundai Palisade (LX2) 2020-2026 Service Manual / Heating,Ventilation And Air Conditioning / Air conditioning System / Auto Defogging Sensor
Description and operation
| Description |
The auto defogging sensor is installed on the front window glass. The sensor
judges and sends signal if moisture occurs to blow out wind for defogging. The
air conditioner control module receives signal from the sensor and restrains
moisture and eliminate defog by controlling the intake actuator, A/C, auto defogging
actuator, blower motor rpm, and mode actuator.
Repair procedures
| Inspection |
To inspect and diagnose the sensor, refer to Self-Diagnosis procedure and DTC
guide.
| Replacement |
|

| 1. |
Disconnect the negative (-) battery terminal.
|
| 2. |
Remove the rain sensor inner cover (A).
|
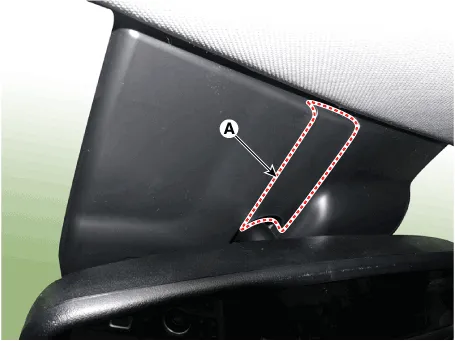
| 3. |
Remove the rain sensor cover (A).
|

| 4. |
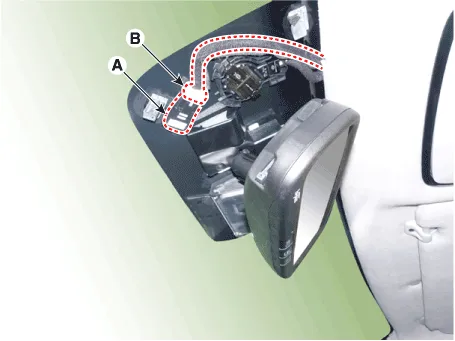
Separate the auto defogging sensor connector (B) and remove the auto
defogging sensor (A).
|
| 5. |
Install in the reverse order of removal.
|

Description and operation Description The ambient temperature sensor is located at the front of the condenser and detects ambient air temperature.
Description and operation Description The cluster ionizer makes disinfection and decomposition of bad smell from the air-conditioner or inflow air.
Other information:
Hyundai Palisade (LX2) 2020-2026 Service Manual: Heater Core
Repair procedures Replacement 1. Disconnect the negative (-) battery terminal. 2. Remove the heater and blower assembly. (Refer to Heater - "Heater Unit") 3.
Hyundai Palisade (LX2) 2020-2026 Service Manual: Specifications
Categories
- Manuals Home
- Hyundai Palisade Owners Manual
- Hyundai Palisade Service Manual
- Power Outlet
- Rear Heater Unit
- Maintenance
- New on site
- Most important about car

Copyright © 2026 www.hpalisadelx.com - 0.0155