Hyundai Palisade: Fuel Delivery System / High Pressure Fuel Pump
		
		
		Repair procedures
	
		| 1. | 
		
		 
			Release the residual pressure in fuel line. 
		
			(Refer to Fuel Delivery System - "Release Residual Pressure in Fuel 
			Line") 
		 | 
	
	
		| 2. | 
		
		 
			Switch "OFF" the ignition and disconnect the negative (-) battery terminal. 
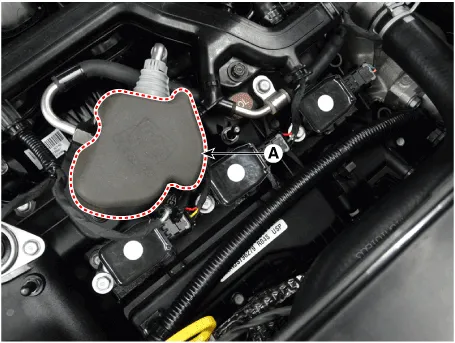
		 | 
	
	
		| 3. | 
		
		 
			Remove the high pressure fuel pump foam (A). 
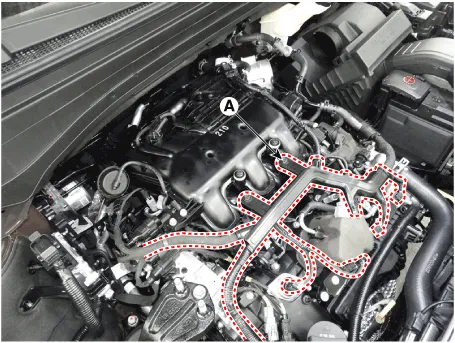
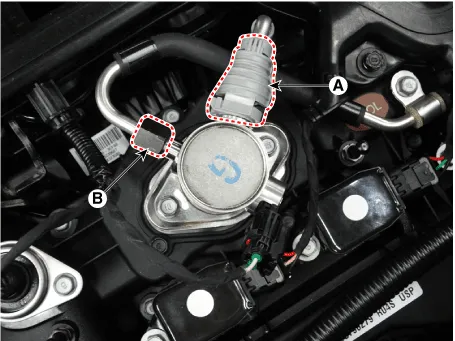
		
		  
		 | 
	
	
		| 4. | 
		
		 
			Remove the control wiring harness (A). 
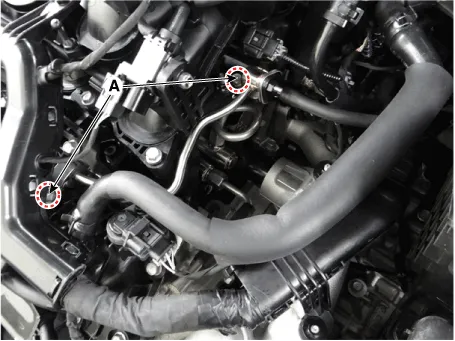
		
		  
		 | 
	
	
		| 5. | 
		
		 
			Remove the fuel line mounting bolts (A). 
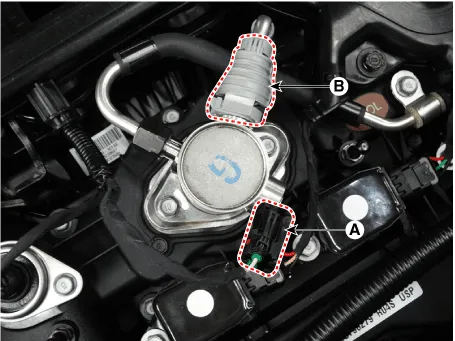
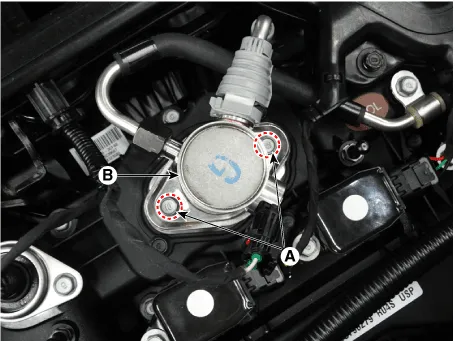
		
		  
		 | 
	
	
		| 6. | 
		
		 
			Disconnect the high pressure fuel control valve connector (A) and low 
			pressure fuel feed tube quick-connector (B). 
		
		  
		 | 
	
	
		| 7. | 
		
		 
			Remove the high pressure fuel pipe. 
		
			(Refer to Fuel Delivery System - "Fuel Line") 
		 | 
	
	
		| 8. | 
		
		 
			Remove the mounting bolts (A), and then remove the high pressure fuel 
			pump (B) from the cylinder head assembly. 
		
			
				| 
				 
					High pressure fuel pump mounting bolt :  
				
					12.8 - 14.7 N.m (1.3 - 1.5 kgf.m, 9.4 - 10.9 lb-ft) 
				 | 


						| •
						 | 
						
						 
							Unscrew in turns the two bolts in small steps (0.5 turns). 
							When one of the two bolts is fully unscrewed while the 
							other bolt still intact, the housing surface of the 
							cylinder head may be broken due to tension of the pump 
							spring. 
						
						  
						 | 
					 
				 
				 | 
			 
		 
		 | 


				| •  | 
				
				 
					Be sure that the low pressure fuel hose quick-connector (A) 
					is completely connected to the high pressure fuel pump by the 
					locking sound. 
				 | 


				| •  | 
				
				 
					Double-check the complete connection of the low pressure fuel 
					hose to the high pressure fuel pump by pulling it after connecting. 
				 | 


				| •  | 
				
				 
					Be sure to install the high pressure fuel pipe (B) to the specified 
					torques.  
				 | 


				| •  | 
				
				 
					Because fuel leak may cause fire, thoroughly inspect leakage 
					of all fuel line connection parts at engine start condition. 
				
				  
				 | 
			 
		 
		 | 


				| •  | 
				
				 
					Before installing the high pressure fuel pump, position the 
					roller tappet in the lowest position by rotating the crankshaft. 
					Otherwise the installation bolts may be broken because of tension 
					of the pump spring. 
				 | 


				| •  | 
				
				 
					Do not reuse high pressure fuel pipe. 
				 | 


				| •  | 
				
				 
					When tightening the installation bolts of the high pressure 
					fuel pump, pretighten them by hand first, and then tighten them 
					in turns to the specified torque in small steps (0.5 turns). 
				 | 


				| •  | 
				
				 
					Install the component to the specified torque. 
				 | 


				| •  | 
				
				 
					First, secure the fasteners in place by pretightening them by 
					hand. Then, tighten them to the specified torque using a torque 
					wrench.  
				
					Bolts or nuts not tightened in a straight line with the matching 
					bolt holes or fittings may cause fuel leakage due to broken 
					threads. 
				 | 


				| •  | 
				
				 
					Note that internal damage may occur when the component is dropped. 
					In this case, use it after inspecting. 
				 | 
			 
		 
		 | 


				| •  | 
				
				 
					Apply engine oil to the O-ring (A) of the high pressure fuel 
					pump, the roller tappet (B), and the protrusion (C). Also apply 
					engine oil to the groove on the location where the protrusion 
					(C) is installed. 
				
				  
				 | 
			 
		 
		 | 


				| •  | 
				
				 
					Use the special service tool [SST No. : OK353-F6100] to install 
					the high pressure fuel pump. 
				 | 
			 
		 
		 | 
	
	
		| 1. | 
		
		 
			Install in the reverse order of removal. 
		 | 
	
   Repair procedures
	
		Removal


				• 
				
				
					When removing the high pressure fuel pump, high pressure fuel 
					pipe, delivery pipe, and injector, injury may be caused by leakage 
					of high pressure fuel...
   
 
   Other information:
   
The Lane Keeping Assist (LKA) system 
helps detect lane markers on the 
road with a front view camera at the 
front windshield, and assists the driver's 
steering to help keep the vehicle 
between lanes.
When the system detects the vehicle 
straying from its lane, it alerts the 
driver with a visual and audible warning, 
while applying a counter-steering 
torque, trying to help prevent the 
vehicle from moving out of its lane...
   
   Repair procedures
	
		Replacement


				• 
				
				
					Take care to not let the tailgate fall on you as the lifts are 
					removed. Have a helper hold the tailgate open, or use a secure 
					method to hold it open...


		Categories


Air bag warning labels, required by 
the U.S. National Highway Traffic 
Safety Administration (NHTSA), are 
attached to alert the driver and passengers 
of potential risks of the air 
bag system. Be sure to read all of the 
information about the air bags that 
are installed on your vehicle in this 
Owners Manual.
read more