Hyundai Palisade (LX2): Light bulbs / Rear combination lamp light replacement
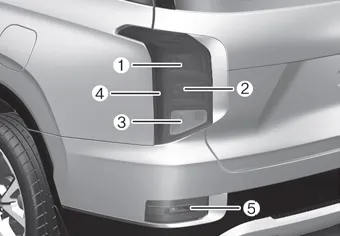
â– Type A (Standard)
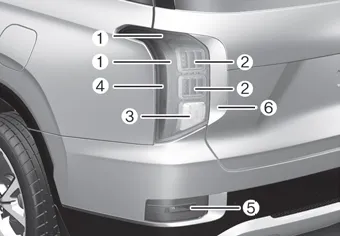
â– Type B (LED)
â– Type A
(1) Tail lamp
(2) Tail/Stop lamp
(3) Turn signal lamp
(4) Side marker lamp
(5) Backup lamp
â– Type B
(1) Tail lamp, Side marker
(2) Stop lamp
(3) Turn signal lamp
(4) Side marker lamp
(5) Backup lamp
(6) Garnish lamp
Stop/Tail lamp and turn signal lamp (Type A)
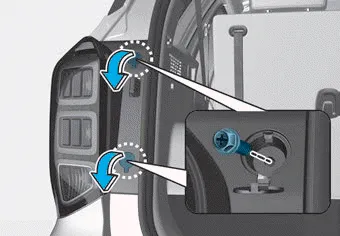
1. Turn off the engine.
2. Open the liftgate.
3. Loosen the lamp assembly retaining screws with a cross-tip screwdriver.
4. Remove the rear combination lamp assembly from the body of the vehicle.
5. Remove the socket from the assembly by turning the socket counterclockwise until the tabs on the socket align with the slots on the assembly.
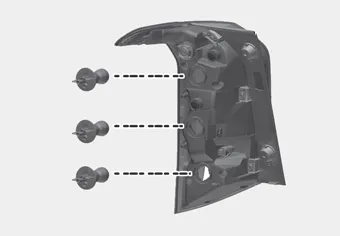
6. Remove the bulb from the socket by pressing it in and rotating it counterclockwise until the tabs on the bulb align with the slots in the socket. Pull the bulb out of the socket.
7. Insert a new bulb by inserting it into the socket and rotating it until it locks into place.
8. Install the socket into the assembly by aligning the tabs on the socket with the slots in the assembly. Push the socket into the assembly and turn the socket clockwise.
9. Reinstall the lamp assembly to the body of the vehicle.
Side maker lamp (Type A,B), tail/stop lamp, turn signal lamp (Type B), garnish lamp
If the LED lamp does not operate, have the system checked by an authorized HYUNDAI dealer.
The LED lamps cannot replaced as a single unit because it is an integrated unit. The LED lamps has to be replaced with the unit.
A skilled technician should check or repair the LED lamp, for it may damage related parts of the vehicle.
Back up lamp
If the light bulb does not operate, have the vehicle checked by an authorized HYUNDI dealer.
If the LED lamp (1) does not operate, have the system checked by an authorized HYUNDAI dealer. The LED lamps cannot be replaced as a single unit because it is an integrated unit.
If the LED lamp (1) does not operate, have the system checked by an authorized HYUNDAI dealer. The LED lamps cannot be replaced as a single unit because it is an integrated unit.
Other information:
Hyundai Palisade (LX2) 2020-2026 Service Manual: Front Radar Unit
Specifications Specification Item Specification Power supply (V) 12 Operation voltage (V) 9 - 16 Description and operation Description The smart cruise control unit is installed on the front right-hand side of the chass
Hyundai Palisade (LX2) 2020-2026 Service Manual: Troubleshooting
Trouble Symptom Charts Trouble Symptom 1 Trouble Symptom 2 Trouble symptom Probable cause Remedy The set vehicle speed varies greatly upward or downward "Surging" (repeated alternating acceleration and deceleration) occurs after set
Categories
- Manuals Home
- Hyundai Palisade Owners Manual
- Hyundai Palisade Service Manual
- Emergency liftgate safety release
- Electrochromatic Mirror (ECM) with homelink system
- Engine Mechanical System
- New on site
- Most important about car
