Hyundai Palisade (LX2): Floor Carpet / Repair procedures
Hyundai Palisade (LX2) 2020-2026 Service Manual / Body (Interior and Exterior) / Floor Carpet / Repair procedures
| Replacement |
|

|

| 1. |
Remove the front seat assembly.
(Refer to Front Seat - "Front Seat Assembly")
|
| 2. |
Remove the rear seat cushion assembly.
(Refer to Rear Seat - "Rear Seat Assembly")
|
| 3. |
Remove the floor console assembly.
(Refer to Floor Console - "Floor Console Assembly")
|
| 4. |
Remove the cowl side trim.
(Refer to Interior Trim - "Cowl Side Trim")
|
| 5. |
Remove the center pillar lower trim.
(Refer to Interior Trim - "Center Pillar Trim")
|
| 6. |
Remove the accelerator pedal module.
(Refer to Fuel system - "accelerator pedal")
|
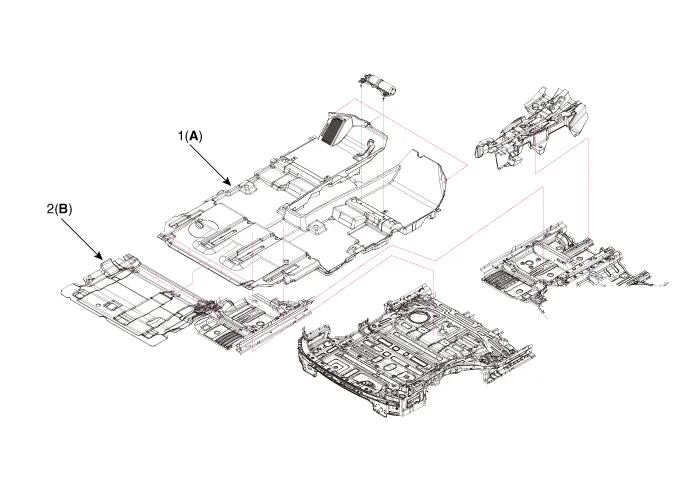
| 7. |
Remove the front floor carpet assembly (A) , and rear floor carpet assembly
(B).
|
| 8. |
To install, reverse removal procedure.
|

Other information:
Hyundai Palisade (LX2) 2020-2026 Service Manual: Compressor oil
Repair procedures Oil Specification 1. The R-134a or R-1234yf system requires synthetic (PAG) compressor oil whereas the R-12 system requires mineral compressor oil. The two oils must never be mixed. 2.
Hyundai Palisade (LX2) 2020-2026 Service Manual: Specifications
Categories
- Manuals Home
- Hyundai Palisade Owners Manual
- Hyundai Palisade Service Manual
- Scheduled maintenance services
- Power Outlet
- Body Electrical System
- New on site
- Most important about car

Copyright © 2026 www.hpalisadelx.com - 0.0146