Hyundai Palisade (LX2): Power Liftgate / Emergency liftgate safety release

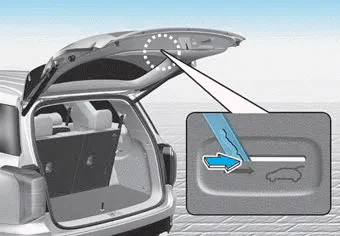
Your vehicle is equipped with an emergency liftgate safety release lever located on the bottom of the liftgate inside the vehicle.
To unlock and open the liftgate manually from inside the luggage compartment, perform the following steps:
1. Push the release lever to the right by using a key.
2. Push up the liftgate.
WARNING
- Be aware of the location of the emergency liftgate safety release lever in your vehicle and know how to open the liftgate using the safety release lever.
- No one should be allowed to occupy the luggage compartment of the vehicle at any time. The luggage compartment is a very dangerous location in the event of a crash.
- Use the release lever for emergencies only. Use extreme caution, especially while the vehicle is in motion.
Follow the instructions below to set the fully open height of the power liftgate: 1. Position the liftgate manually to the height you prefer. 2. Press the power liftgate inner button for more than 3 seconds.
On vehicles equipped with a smart key, the liftgate can be opened with hands-free activation using the Smart Liftgate system. How to use the Smart Liftgate The hands-free smart liftgate system can be opened automatically when the following conditions are met: The Smart Liftgate option is enabled in the User Settings in the cluster LCD display The Smart Liftgate is activated and ready 15 seconds after all the doors are closed and locked The Smart Liftgate will open when the smart key is detected in the area behind the vehicle for 3 seconds Information The Smart Liftgate will NOT operate when: Any door is open, or all doors are closed but not locked The smart key is detected within 15 seconds from when the doors were closed and locked For vehicles equipped with illuminated exterior front door handles, if the smart key is detected within 15 seconds from when the doors were closed and locked or if the smart key is within 60 inches (1.
Other information:
Hyundai Palisade (LX2) 2020-2026 Service Manual: Specification
Hyundai Palisade (LX2) 2020-2026 Service Manual: Power Mosfet (DATC)
Repair procedures Inspection 1. Turn the ignition switch ON. 2. Manually operate the control switch and measure the voltage of the blower motor. 3. Select the control switch to raise the voltage until high speed.
Categories
- Manuals Home
- Hyundai Palisade Owners Manual
- Hyundai Palisade Service Manual
- How to reset the power liftgate
- Resetting the Driver's Seat Memory System
- Emergency liftgate safety release
- New on site
- Most important about car
