Hyundai Palisade: Forward Collision-Avoidance Assist (FCA) System / Repair procedures
Driver Setting
| – |
The ON/OFF for FCA is included in the USM (User Setting Menu) and the
default is ON.
|
| – |
While IGN is On, it stays at ON, however, the driver's settings do not
last next time when IGN is newly On.
|
| – |
When VDC is OFF, FCA is also turned OFF.
|
Inspection procedure for vehicle with Forward Collision-Avoidance Assist system
failure
| 1. |
Check the bumper appearance for accident (check the vehicle appearance
visually and see bumper replacement history).
→ In case of the vehicle was involved in an accident, there is a high
possibility that the FCA radar is out of the original default position.
|
| 2. |
Check for contamination of the radar sensor cover of the bumper.
→If contaminated, there is a high possibility that the FCA system is
deactivated during operation due to the foreign substances.
|
| 3. |
After turning on the engine, check the FAC warning lamp and DTC.
(Refer to the DTC diagnosis guide.)
|
| • |
Be careful not to damage the parts located under the vehicle
(floor under cover, fuel filter, fuel tank and canister) when
raising the vehicle using the lift.
(Refer to General Information - "Lift and Support Points")
|
|
[FCA Radar]
| 1. |
Turn ignition switch OFF and disconnect the negative (-) battery cable.
|
| 2. |
Remove the front bumper cover.
(Refer to Body - "Front Bumper Assembly")
|
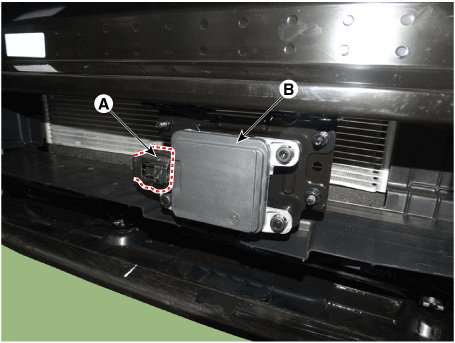
| 3. |
Disconnect the FCA rader connector (A).
|
| 4. |
Remove the FCA rader (B) after loosening the FCA rader mounting nuts.
|
Tightening torque :
3.9 - 4.3 N.m (0.40 - 0.44 kgf.m, 2.9 - 3.2 lb-ft)
|

|
[Lane Keeping Assist (LKA) Unit]
FCA, contrary to SCC w/ S&G has to work on a stationary car so the system uses
the Fusion Target system to combine radar and camera.
| 1. |
Turn ignition switch OFF and disconnect the negative (-) battery cable.
|
| 2. |
Remove the lane keeping assist (LKA) unit.
(Refer to Body Electrical System - "Lane Keeping Assist (LKA) Unit")
|
[FCA Radar]
| • |
Put the vehicle on the level ground.
|
| • |
Take out heavy luggage from the vehicles’ seats or trunk.
|
| • |
Set all tires according to the specified pressure.
|
| • |
Check that the front surface of the front radar is clean.
|
|
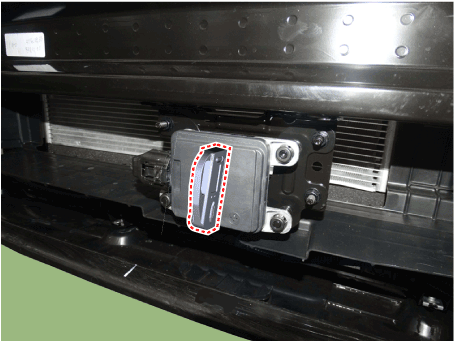
| 1. |
Check the last 2 digits of Lot. No (A) on label at rear side before
installing the front radar.
| •
|
The meaning of Lot. No (A) is the vertical deviation
angle of front radar inner side.
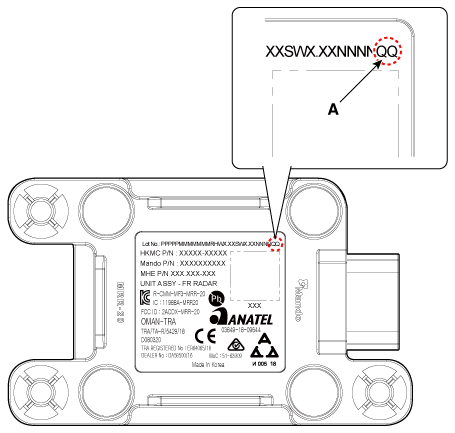
|
|
|
| 2. |
Install the front radar (B) by tightening the nuts.
|
Tightening torque :
3.9 - 4.3 N.m (0.40 - 0.44 kgf.m, 2.9 - 3.2 lb-ft)
|
|
| 3. |
Connect the front radar connector (A).
|
| 4. |
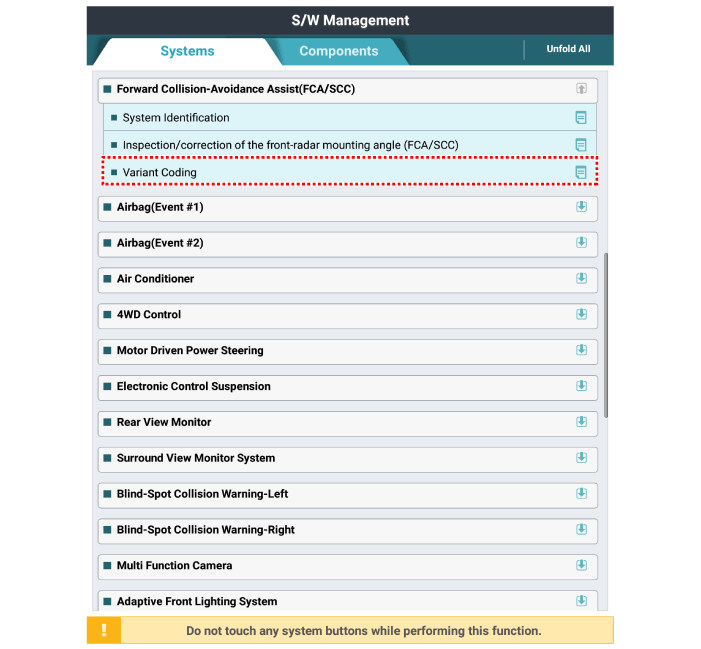
If replaced the front radar with a new one, perform variant coding procedure
by using the GDS.
|
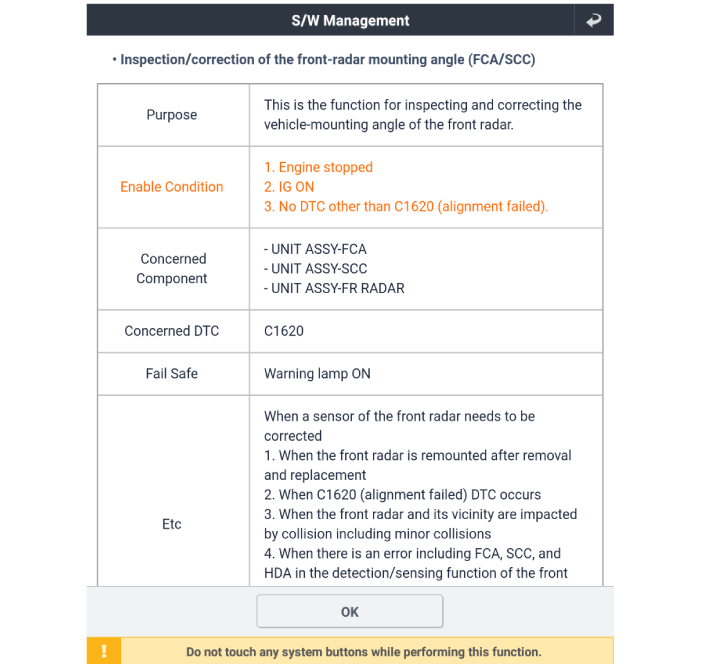
| 5. |
Check and align the front radar mounting angle.
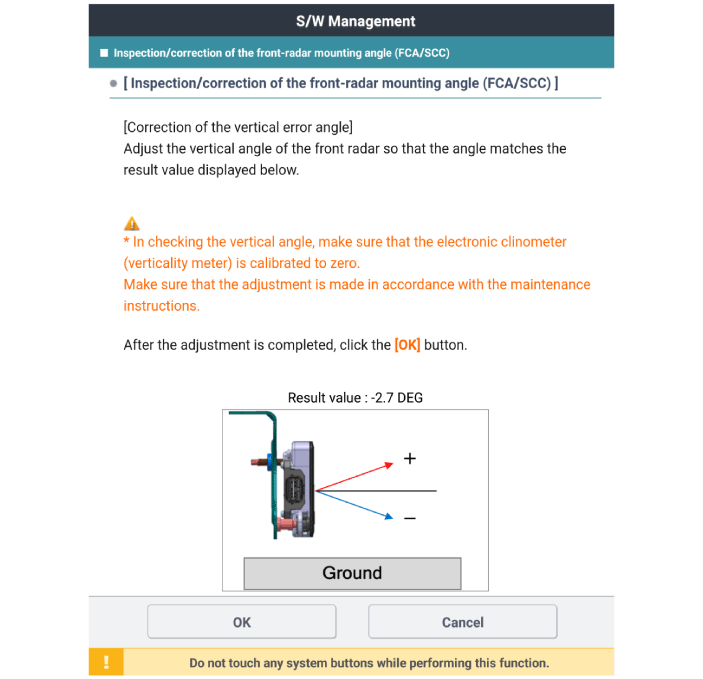
| (1) |
Perform the "inspection/correction of the front-radar mounting
angle" using the GDS.

|
| (2) |
Input 2 digits of value in the code input box, then press "OK"

|
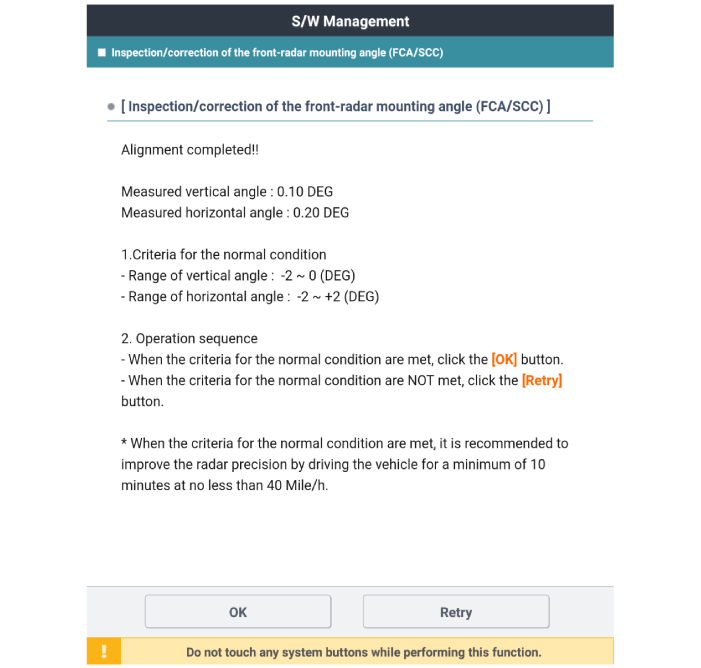
| (3) |
Check the vertical angle which is compensated error on KDS.
|
• |
The result value is final goal vertical angle
which is compensated inner error of criteria
vertical installation angle -1°.
|
|
|
| (4) |
Check the front radar vertical angle by using the vertical protractor
(tiltmeter).
|
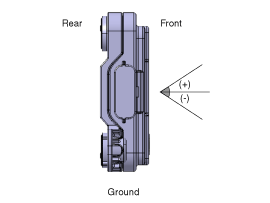
• |
Make sure to perform zero setting before using
vertical protractor. (perform this procedure
periodically)
|
|
• |
Be noticed about indicated +/- differently by
the way to indicate of vertical protractor.
|
|
|
| (5) |
Adjust to "target vertical angle" by turning adjusting screw
of front radar.
| –
|
turning clockwise : adjusting (+) angle
|
| –
|
turning counterclockwise : adjusting (-) angle
|
|
• |
There is a chance to be transformed of bracket
if adjusting screw with over strength.
|
|
• |
Must recheck with vertical protractor if vertical
angle is right after adjusting.
|
|
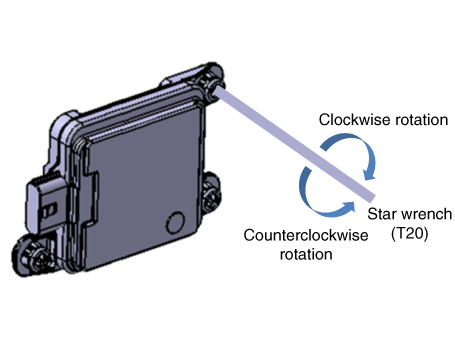
of adjustment screw rotation
|
Correction angle
|
Clockwise
|
Counter clockwise
|
0.5
|
+ 0.5°
|
- 0.5°
|
1
|
+ 1.0°
|
- 1.0°
|
1.5
|
+ 1.5°
|
- 1.5°
|
2
|
+ 2.0°
|
- 2.0°
|
2.5
|
+ 2.5°
|
- 2.5°
|
3
|
+ 3.0°
|
- 3.0°
|
3.5
|
+ 3.5°
|
- 3.5°
|
4
|
+ 4.0°
|
- 4.0°
|
4.5
|
+ 4.5°
|
- 4.5°
|
5
|
+ 5.0°
|
- 5.0°
|
|
|
| 6. |
Install the front bumper assembly.
(Refer to Body - "Front Bumper Assembly")
|
| 7. |
Perform the FCA radar inspection/correction procedure by using the SST.
(Refer to FCA Radar - "Adjustment")
|
[Lane Keeping Assist (LKA) Unit]
FCA, contrary to SCC w/ S&G has to work on a stationary car so the system uses
the Fusion Target system to combine radar and camera.
| 1. |
Turn ignition switch OFF and disconnect the negative (-) battery cable.
|
| 2. |
Remove the lane keeping assist (LKA) unit.
(Refer to Body Electrical System - "Lane Keeping Assist (LKA) Unit")
|
FCA Radar Installation Angle Checking/adjustment Overview
The front radar detects control subject in front, and recognize distance from
the subject, comparing speed and etc,. For these reasons the direction of installation
has to be on collinear with vehicle. Therefore, installing angle inspection
and adjustment have to be done in case of the FCA radar removed and reinstalled
caused by accident or install a new front radar. Accuracy of the front radar
cannot be guaranteed if inspection and adjustment have not been done in case
of mentioned situation before.
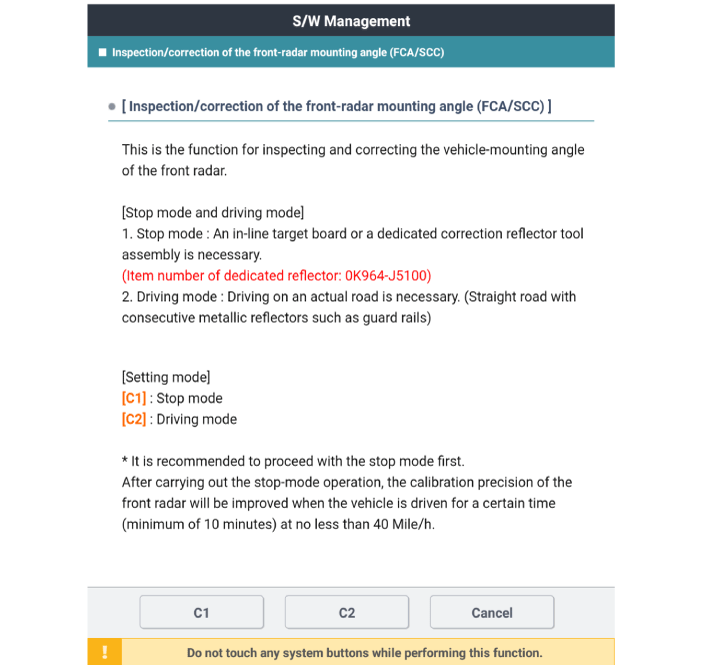
Front radar inspection/adjustment have to be done with either stop mode (C1)
or drive mode (C2) using by GDS
Perform adjustment procedure with exclusive adjustment reflector (SST) for stop
mode (C1).
| • |
after operating stop mode, the accuracy will be increased if
the vehicle has driven more than 10 min.
(drive on straight lane which has metallic reflector.)
|
| • |
Operate adjustment on real road driving (drive on the road that
has many metallic fixed reflector such as guard rail) for drive
mode. (C2)
|
|
|
The cases that front radar installation angle checking/adjustment are
needed.
| • |
Front radar has been replaced
|
| • |
Front radar has been removed and reinstalled.
|
| • |
Line up failed DTC has been occurred
|
| • |
Failure on front radar detecting and cognition function
|
| – |
failed to detect vehicle in front while functioning
|
| – |
often detecting error of side lane
|
| – |
often detecting error even though any object is not in front
|
|
How to Check/adjust Front Radar Installation Angle - Stop Mode
|
Preparation before the front radar alignment:
| • |
Put the vehicle on the level ground.
|
| • |
Take out heavy luggage from the vehicles’ seats or trunk.
|
| • |
Set all tires according to the specified pressure.
|
| • |
Check that the front surface of the front radar is clean.
|
|
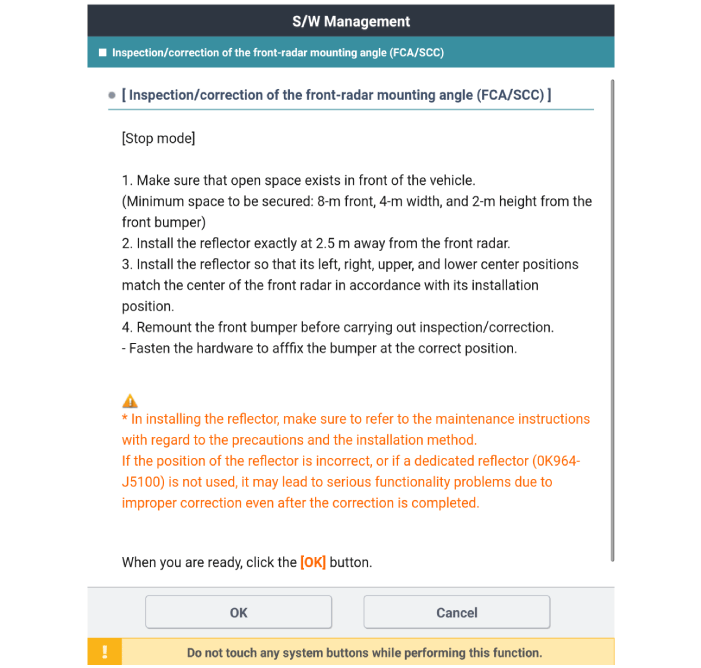
| • |
Perform in an area with minimum clearance of 8m (26.2 ft) front,
4m (13.1 ft) sides, and 2 m (6.6 ft) above the vehicle.
|
| • |
Install the reflector exactly 2.5 m (8.2 ft) away from the Front
Radar.
|
| • |
The reflector has to be installed at same place (height and
angle) as front radar center.
(If height and angle are different, then adjustment can not
be done correctly.)
|
| • |
Remove objects (metal plates, resins, etc.) that may cause electric
signal interference from the area where front radar alignment
is performed.
|
| • |
Make sure to use exclusive reflector (OK964-J5100)
|
| • |
Be sure that the vehicle is not moved and free from vibration
when performing front radar alignment
(getting in/out or opening/closing doors).
|
| • |
IG has to be on when performing front radar alignment. (engine
stop condition)
|
|
| 1. |
Stop the vehicle horizontally at a flat place.

|
| 2. |
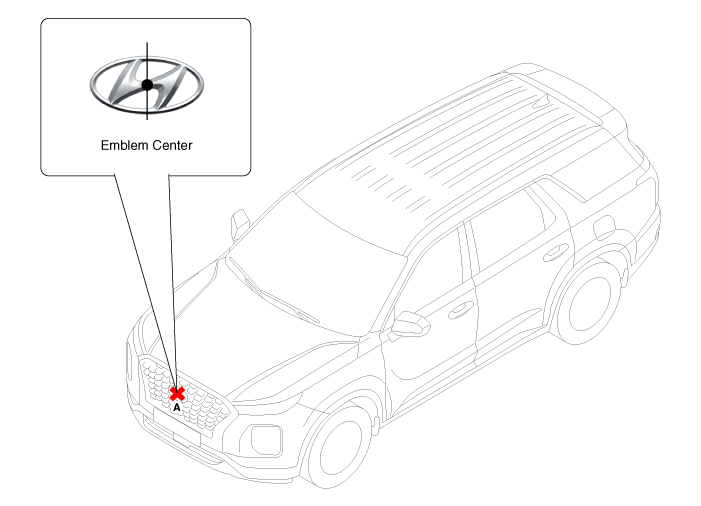
Mark the center point of emblem (A).
|
| 3. |
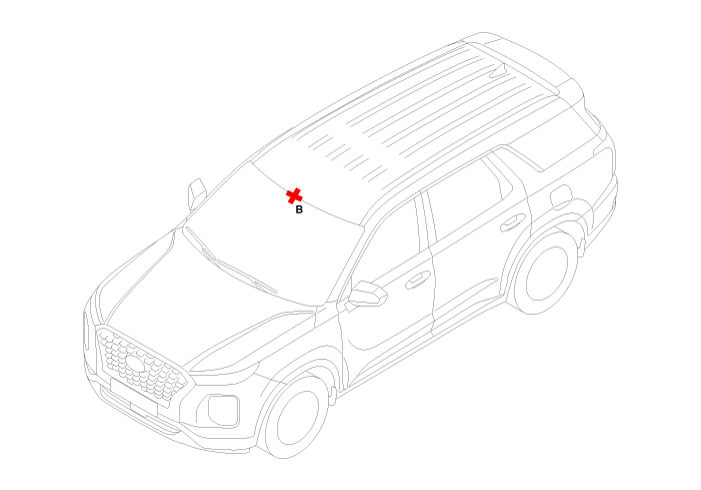
Mark the center point (B) after measuring the distance on top of wind
glass.
|
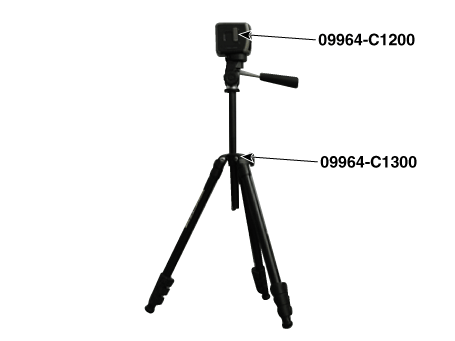
| 4. |
Install the laser (09964-C1200) to the tripod (09964-C1300).
|
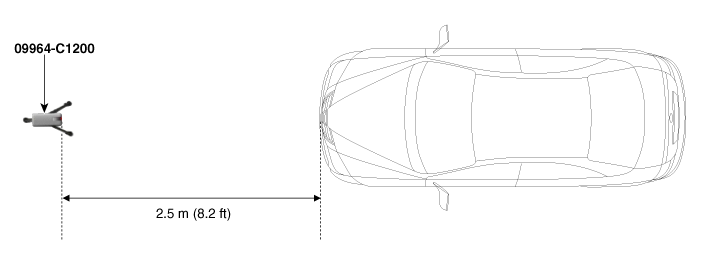
| 5. |
Place the laser (09964-C1200) at 2.5m (8.2 ft) to the front of the vehicle.
|
| 6. |
Match the vertical line of laser to (A) and (B) using the laser (09964-C1200).
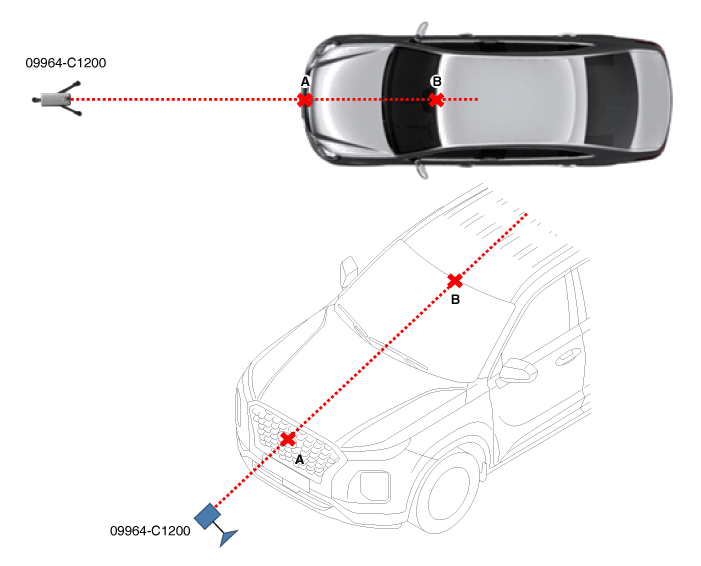
|
| 7. |
Mark (C) at 2.5 mm (8.2 ft) from (A) in front of the vehicle.
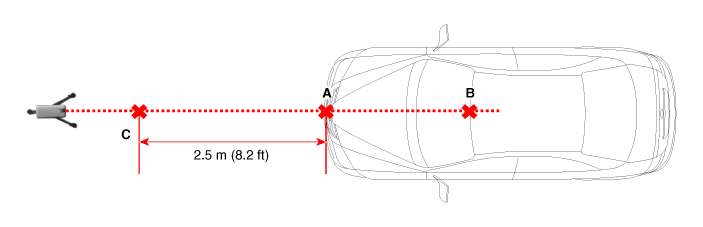
|
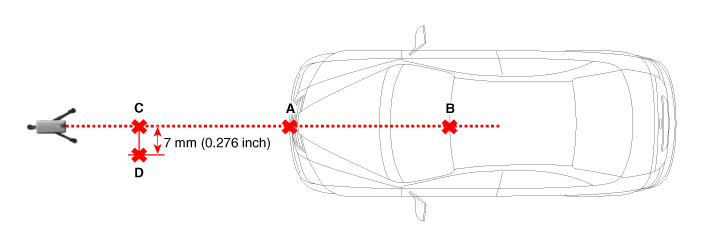
| 8. |
Mark (D) at the place which is 7mm (0.276 inch) away from (C) to the
right in vertical direction.
|
| 9. |
Remove the laser (09964-C1200) from the tripod (09964-C1300).

|
| 10. |
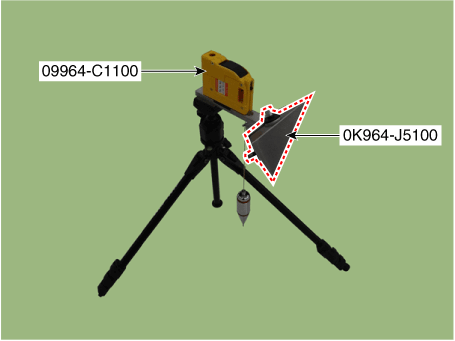
Mount the reflector (09964-C1100) onto the tripod (09964-C1300).
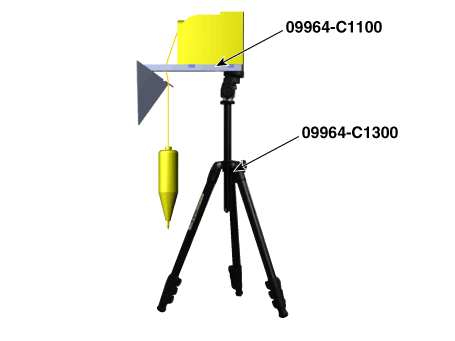
|
| 11. |
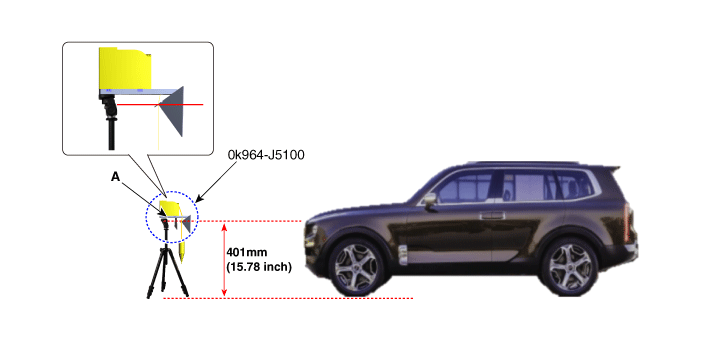
Mount the reflector adapter (0K964-J5100) to the reflector (09964-C1100).
|
| 12. |
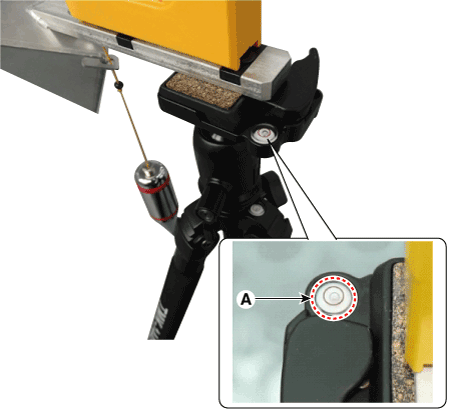
Set the reflector horizontal using the leveler (A) which is built in
the tripod (09964-C1300).
|
| 13. |
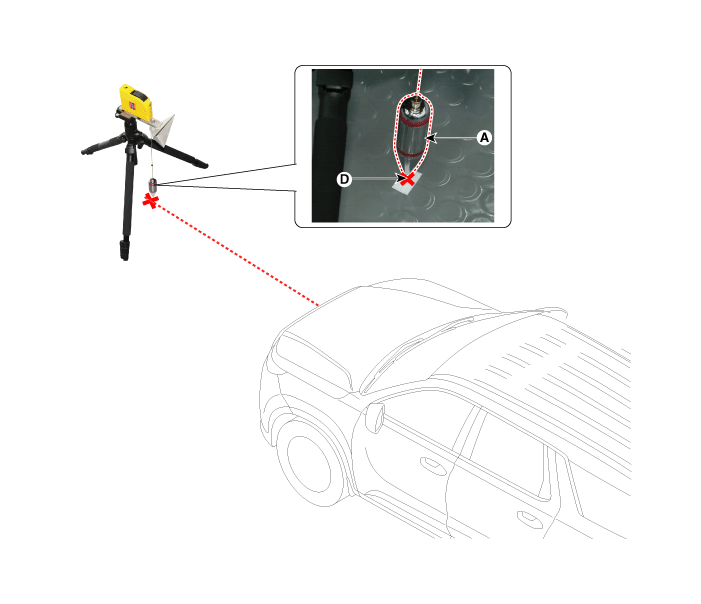
Align the vertical weight (A) of the reflector (0K964-J5100) with the
point (D).
|
| 14. |
Set the height of the reflector adapter (0K964-J5100) to 401mm (15.78
inch).
|
| 15. |
Remove the vertical weight from the reflector (0K964-J5100).
| •
|
It can be effected to adjustment if the vertical weight
is still left.
|
|
|
| 16. |
Check again the front radar and the surface of front bumper for the
following items with the eyes.
| •
|
Make sure that there is no debris, or reflecting object
on the surface of the radar.
|
| •
|
Make sure that there is no debris, or reflecting object
on the radiator grill.
|
|
|
| 17. |
Select C1 (stop mode) to inspect and adjust the front radar installation
angle by following procedure on GDS screen.
|
| 18. |
In case of front radar inspection/correction failure, check the inspection/correction
conditions.
|
Other information:
Repair procedures
Removal
1.
Disconnect the negative (-) battery terminal.
2.
Remove the glove box housing.
(Refer to Body - "Glove Box Housing Cover")
3...
Description and operation
Description
Manifold Absolute Pressure Sensor (MAPS) is a speed-density type sensor installed
on the surge tank. It senses absolute pressure of the surge tank and transfers
the analog signal proportional to the pressure to the ECM...
Categories
To lock your vehicle using the door
handle button or the Smart Key:
1.Make sure all doors, the hood and
the liftgate are closed.
2.Make sure you have the smart key
in your possession.
read more


