Hyundai Palisade (LX2): Seats / Rear Seats
Rear seat adjustment

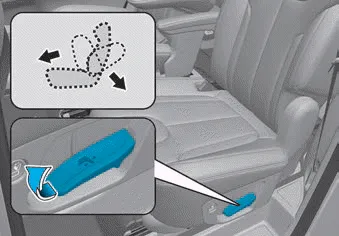
Forward and rearward (2nd row seat)
To move the seat forward or rearward:
1. Pull the seat slide adjustment lever up and hold it.
2. Slide the seat to the position you desire.
3. Release the lever and make sure the seat is locked in place.
Adjust the seat before driving, and make sure the seat is locked securely by trying to move forward and rearward without using the lever. If the seat moves, it is not locked properly.
Seatback angle (2nd row seat)
To recline the seatback:
1. Pull up the seatback recline lever.
2. Hold the lever and adjust the seatback of the seat to the position you desire.
3. Release the lever and make sure the seatback is locked in place.
(The lever MUST return to its original position for the seatback to lock.)
Seatback angle (3rd row seat) (Type A)
To recline the seatback:
1. Pull up the seatback recline strap.
2. Hold the strap and adjust the seatback of the seat to the position you desire.
3. Release the strap and make sure the seatback is locked in place. (The strap MUST return to its original position for the seatback to lock.)
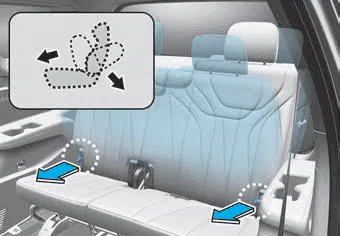
Seatback angle (3rd row seat) (Type B)
To recline the seatback:
1. Push the control switch to recline the seat back.
2. Release the switch once the seatback reaches the desired position.
- Walk-in seat (2nd row seat)
- Folding the rear seat
- 2nd row seat folding (from outside)
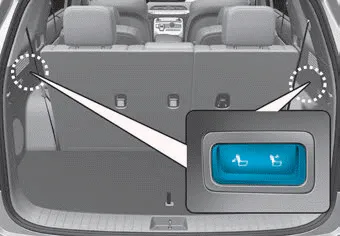
- 3rd row seat remote folding/unfolding
- Detection of object caught
- Armrest, Rear occupant alert system
The seatback pocket is provided on the back of the front passenger's seatback. WARNING To prevent the Occupant Classification System from malfunctioning: Do not hang onto the front passenger's seatback.
To get in or out of the 3rd row seat, 1. Routing the seat belt webbing through the rear seat belt guide clip. After inserting the seat belt, tighten the belt webbing by pulling it up.
Other information:
Hyundai Palisade (LX2) 2020-2026 Service Manual: Special service tools
Special Service Tools Tool Name / Number Illustration Description LKA Compensator (09890-3V100) Used for compensating front view camera unit Tolerance Compensation Plate for Surround View Monitoring (09957-CM100)
Hyundai Palisade (LX2) 2020-2026 Service Manual: Cruise Control (CC) Switch
Components and components location Components 1. Remote control switch (Audio swtich) 2. Remote control switch (Cruise control switch) Schematic diagrams Circuit Diagram Repair procedures Removal 1.
Categories
- Manuals Home
- Hyundai Palisade Owners Manual
- Hyundai Palisade Service Manual
- Lift and Support Points
- Components and components location
- Automatic Transaxle System (A8LF1)
- New on site
- Most important about car
