Hyundai Palisade (LX2): Exterior features / Hood
Opening the hood
1. Park the vehicle and set the parking brake.
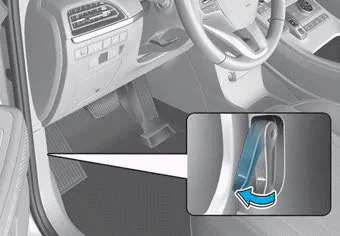
2. Pull the release lever to unlatch the hood. The hood should pop open slightly.

3. Go to the front of the vehicle, raise the hood slightly, push up the secondary latch (1) inside of the hood center and lift the hood (2). After it has been raised about halfway, it will raise completely by itself.
Closing the hood
1. Before closing the hood, check in and around the engine compartment to ensure the following:
- Any tools or other loose objects
are removed from the engine
room area or hood opening area
- All glove, rags, or other combustible
material is removed from
the engine compartment
- All filler caps are tightly and correctly
installed
2. Lower the hood halfway (lifted approximately 12 inches (30 cm) from the closed position) and push down to securely lock in place. Then double check to be sure the hood is secure. If the hood can be raised slightly, it is not securely locked. Open it again and close it with more force.
WARNING
- Before closing the hood, ensure all obstructions are removed from around the hood opening.
- Always double check to be sure that the hood is firmly latched before driving away. Check there is no hood open warning light or message displayed on the instrument cluster. Driving with the hood opened may cause a total loss of visibility, which might result in an accident.
- Do not move the vehicle with the hood in the raised position, as vision is obstructed, which might result in an accident, and the hood could fall or be damaged.
Opening the liftgate Before attempting to open the liftgate, make sure the vehicle is in P (Park). To open the liftgate, perform one the following: 1.
Other information:
Hyundai Palisade (LX2) 2020-2026 Service Manual: Auto Defogging Actuator
Description and operation Description The auto defogging sensor is installed on the front window glass. The sensor judges and sends signal if moisture occurs to blow out wind for defogging. The air conditioner control module receives a signal from the sensor and restrains moisture and eliminates defog by the intake actuato
Hyundai Palisade (LX2) 2020-2026 Service Manual: Rear Heater Unit
Components and components location Component Location 1. Rear Heater & A/C Unit Repair procedures Replacement • Be careful not to damage the parts located under the vehicle
Categories
- Manuals Home
- Hyundai Palisade Owners Manual
- Hyundai Palisade Service Manual
- Convenient Features of Your Vehicle
- Power Outlet
- Emergency liftgate safety release
- New on site
- Most important about car
