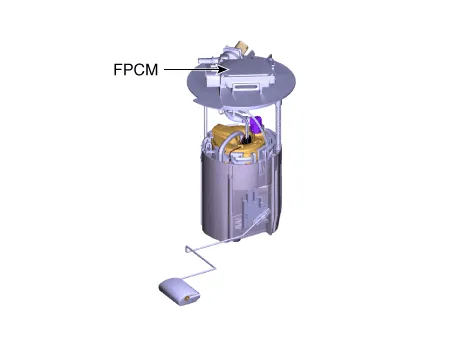
Hyundai Palisade (LX2): Fuel Delivery System / Fuel Pump Control Module (FPCM)
Description and operation
| Description |
| Operation |

| 1. |
The ECM provides target fuel pressure information to the FPCM via CAN
network.
|
| 2. |
The FPS provides the FPCM with actual pressure information of the low
pressure fuel line between the low and high pressure fuel pumps, and
the FPCM forwards the information to the ECM. Also, the FPCM diagnoses
faults in the FPCM, fuel pump motor and FPS and then provides the diagnosis
information to the ECM.
|
| 3. |
The FPCM compares the actual fuel pressure information measured by the
FPS with the target fuel pressure information provided by the ECM and
controls the voltage that is provided to the low pressure fuel pump
motor. The FPCM keeps regulating fuel flow rate by controlling the low
pressure fuel pump, depending on engine speed (rpm) and vehicle loads.
|
Specifications
| Specification |
|
Items |
Specification |
|
|
Applied Voltage (V) |
6 - 18 |
|
|
Current Consumption (A) |
Max. 15 |
|
|
Fuel Pressure |
Start |
Max. 600 KPa (Max. 6.1 kg/cm², Max. 87.0 psi) |
|
In operation |
350 - 500 KPa (3.5 - 5.1 kg/cm², 50.7 - 72.5 psi) |
|
Repair procedures
| Removal |
| 1. |
Release the residual pressure in fuel line.
(Refer to Fuel Delivery System - "Release Residual Pressure in Fuel
Line")
|
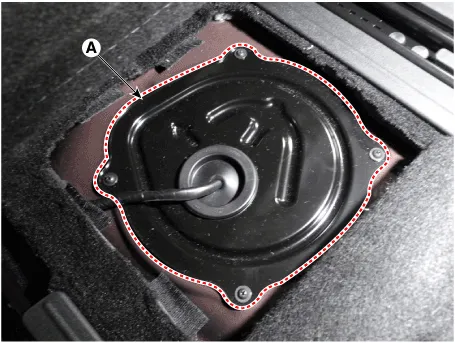
| 2. |
Remove the floor carpet service cover (A).
|

| 3. |
Remove the fuel pump service cover (A) after loosening the mounting
screws.
|
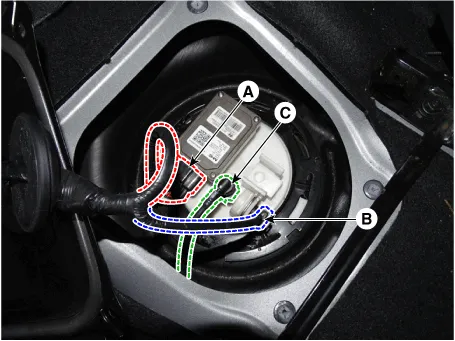
| 4. |
Disconnect the fuel pump control module connector (A) and fuel pressure
sensor connector (B).
|
| 5. |
Disconnect fuel feed tube quick-connector (C).
|
| 6. |
Remove the locking ring (A) by using the special service tool [No.:
09310-B8100].
|

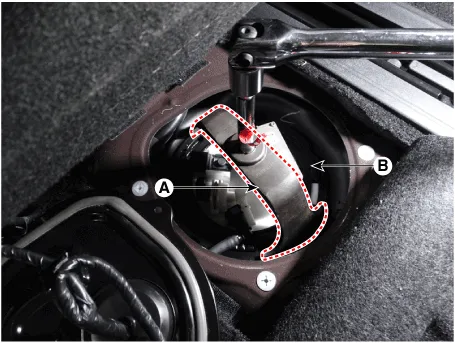
| 7. |
Remove the fuel pump from the fuel tank.
|

| Installation |
| 1. |
Install in the reverse order of removal.
|
Repair procedures Inspection 1. Turn ignition switch OFF and disconnect the negative (-)battery cable. 2.
Description and operation Description The fuel pressure sensor (FPS) is installed on the top of the low pressure fuel pump and measures the pressure in the low pressure fuel line.
Other information:
Hyundai Palisade (LX2) 2020-2026 Service Manual: General safety information and caution
Instructions (R-134a) When Handling Refrigerant 1. R-134a liquid refrigerant is highly volatile. A drop on the skin of your hand could result in localized frostbite. When handling the refrigerant, be sure to wear gloves.
Hyundai Palisade (LX2) 2020-2026 Service Manual: Ultrasonic Sensor
Schematic diagrams Schematic Diagrams Repair procedures Removal 1. Remove the bumper cover. (Refer to Body - "Front Bumper Cover") (Refer to Body - "Rear Bumper Cover") 2.
Categories
- Manuals Home
- Hyundai Palisade Owners Manual
- Hyundai Palisade Service Manual
- Resetting the Driver's Seat Memory System
- Rear Heater Unit
- Electrochromatic Mirror (ECM) with homelink system
- New on site
- Most important about car
