Trouble Symptom
|
Probable Cause
|
Remedy
|
Coolant leakage
|
| • |
From the thermostat gasket
|
|
Check the mounting bolts
|
| • |
Check the torque of the mounting bolts
|
|
| • |
Retighten the bolts and check leakage again.
|
|
Check the gasket for damage
|
| • |
Check gasket or seal for damage
|
|
| • |
Replace gaskets and reuse the thermostat.
|
|
Cooled excessively
|
| • |
Low heater performance (cool air blowed-out)
|
| • |
Thermogauge indicates 'LOW'
|
|
Visually check after removing the radiator cap.
|
| • |
Insufficient coolant or leakage.
|
|
| • |
After refilling coolant, recheck.
|
|
Check GDS & engine start
|
| • |
Check connection of the fan clutch or the fan motor.
|
※ If the fan clutch is always connected, there will be a noise at idle.
|
| • |
Check the engine coolant sensor, wiring and connectors.
|
| • |
Replace the components.
|
|
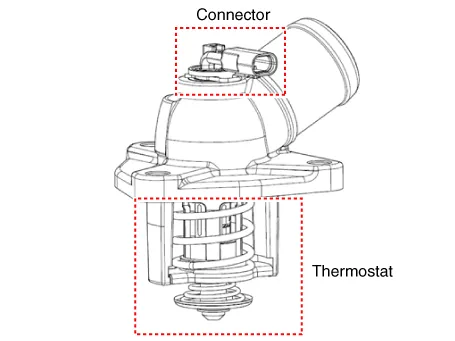
Remove the thermostat and inspect
|
| • |
Check if there are dust or chips in the thermostat valve.
|
| • |
Check adherence of the thermostat.
|
|
| • |
Clean the thermostat valve and reuse the thermostat.
|
| • |
Replace the thermostat, if it doesn't work properly.
|
|
Heated excessively
|
| • |
Thermogauge indicates 'HI'
|
|
Visually check after removing the radiator cap.
|
| • |
Insufficient coolant or leakage.
※Be careful when removing the radiator cap of the overheated
vehicle.
|
| • |
Check air in cooling system.
|
|
| • |
After refilling coolant, recheck.
|
| • |
Check the cylinder head gaskets for damage and the tightening
torque of the mounting bolts.
|
|
Check GDS & engine start
|
| • |
Check the fan motor performance as temperature varies.
|
| • |
Check if the fan clutch slips.
|
| • |
Check for water pump adherence and damaged impeller.
|
|
| • |
Check the engine coolant sensor, wiring and connectors.
|
| • |
Check the fan motor, the relay and the connector.
|
| • |
Replace the fan clutch, if it doesn't work properly.
|
| • |
Replace the water pump, if it doesn't work properly.
|
|
Immerse the thermostat in boiling water and inspect.
|
| • |
After removing the thermostat, check if it works properly.
※ Check the thermostat opens at the valve opening temperature.
|
|
| • |
Replace the thermostat, if it doesn't work properly.
|
|
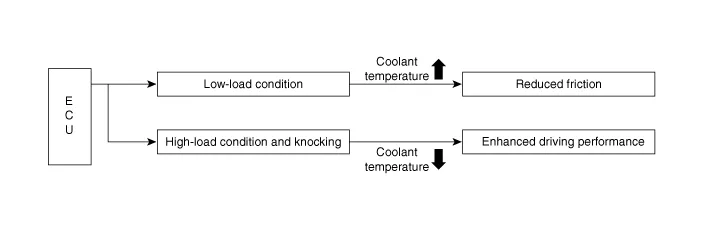
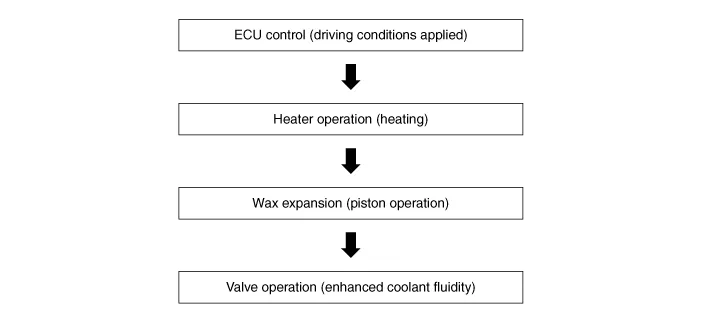
Other information:
Description and operation
Description
The mode control actuator is located at the heater unit.
It adjusts the position of the mode door by operating the mode control actuator
based on the signal of the A/C control unit. Pressing the mode select switch
makes the mode control actuator shift in order of Vent → Bi-Level →
Inspection
1.
Turn the ignition switch ON.
2.
Manually operate the control switch and measure the voltage of the blower
motor.
3.
Select the control switch to raise the voltage until it reaches high
speed.