Hyundai Palisade: Differential Carrier Assembly / Repair procedures

Hyundai Palisade (LX2) 2020-2024 Service Manual / Driveshaft and axle / Differential Carrier Assembly / Repair procedures

Removal
1.
Loosen the wheel nuts slightly.
Raise the vehicle, and make sure it is securely supported.
2.
Remove the rear wheel and tire (A) from rear hub.
Tightening torque :
107.9 - 127.5 N.m (11.0 - 13.0 kgf.m, 79.6 - 94.0 lb-ft)
Hyundai Palisade. Repair procedures   
Be careful not to damage the hub bolts when removing the rear wheel and tire (A).

Hyundai Palisade. Repair procedures

3.
Remove the coupling assembly.
(Refer to 4 Wheel Drive (4WD) System - "Coupling Assembly")
4.
Remove the rear driveshaft.
(Refer to Rear Driveshaft Assembly - "Rear DriveShaft")
5.
Remove rear differentia assembly (B) as loosen mounting (A-4ea) after install jack
Tightening torque:
68.6 - 88.3 N.m (7.0 - 9.0 kgf.m, 50.6 - 65.1 lb-ft)

Hyundai Palisade. Repair procedures

Hyundai Palisade. Repair procedures

Disassembly
Rear differential carrier disassembly
1.
Drain oil by removing the filler plug (A) and drain plug (B) before disassembling the rear differential carrier.
Hyundai Palisade. Repair procedures   
Use a new drain plug and filler plug whenever installing.

Hyundai Palisade. Repair procedures

Hyundai Palisade. Repair procedures

2.
Using the SST(09530-3T300), hold the differential assembly safely.
Hyundai Palisade. Repair procedures   
09530-3T340

Hyundai Palisade. Repair procedures

09530-3T350

Hyundai Palisade. Repair procedures

09530-3T360

Hyundai Palisade. Repair procedures

3.
Remove the air breather plug (A).

Hyundai Palisade. Repair procedures

4.
Loosen the cover bolts and then remove the cover (A).

Hyundai Palisade. Repair procedures

5.
Loosen the bolts and then remove the bearing cap (A).

Hyundai Palisade. Repair procedures

6.
Remove the gear carrier assembly (A).

Hyundai Palisade. Repair procedures

7.
Mark the left and right side bearing race as below when removing the differential assembly to distinguish the sides.

Hyundai Palisade. Repair procedures

8.
Using the screwdriver, remove the left and right side oil seal (A).
Hyundai Palisade. Repair procedures   
Use a new oil seal whenever installing.
[LH]

Hyundai Palisade. Repair procedures

[RH]

Hyundai Palisade. Repair procedures

Gear carrier assembly disassembly
1.
Loosen the seal bolts and then remove the gear carrier (A) and ring gear (B).
Hyundai Palisade. Repair procedures   
Piant match marks on the gear carrier and the ring gear.

Hyundai Palisade. Repair procedures

2.
Using the SST (09452-2E000, 09430-4G400) remove the front and rear bearing (A).

Hyundai Palisade. Repair procedures

Hyundai Palisade. Repair procedures

3.
Mark the left and right side bearing as below when removing the bearing to distinguish the sides.

Hyundai Palisade. Repair procedures

Disassembly the pinion assembly
1.
Using the SST(09530-3T340, 09530-3T350, 09530-3T310), fix the differential carrier assembly (A).

Hyundai Palisade. Repair procedures

2.
Fix the SST (09430-4G200) on the lock nut.
3.
Fix the flange fix (A) on the SST (09430-4G200).

Hyundai Palisade. Repair procedures

4.
Insert the SST 09530-2W400) to the hole of the hexagon and then remove the lock nut (A).

Hyundai Palisade. Repair procedures

5.
Using the press, remove the drive pinion shaft (A).

Hyundai Palisade. Repair procedures

6.
Using the screwdriver, remove the pinion oil seal (A).

Hyundai Palisade. Repair procedures

7.
Remove the pinion front bearing (A).

Hyundai Palisade. Repair procedures

8.
Using a hammer and chisel, remove the pinion bearing outer race (A).

Hyundai Palisade. Repair procedures

Hyundai Palisade. Repair procedures

9.
Using the SST (09452-2E000, 09430-4G100), press the drive pinion shaft and then remove the front bearing.

Hyundai Palisade. Repair procedures

Reassembly
Pinion drive gear height adjustment
Adjust the height of the drive pinion in the following order.
1.
Below are the special tools to measure the pinion height

Hyundai Palisade. Repair procedures

2.
The special tool lock nut (A), pinion oil seal (B), pinion front bearing (C), inner bearing (D) and special tool support body (E) are mounted as follows.
Tightening torque :
88.3 - 137.3 Nm (9.0 - 14.0 kgf.m, 65.1 - 101.3 lb-ft)

Hyundai Palisade. Repair procedures

3.
Put the main body (A) on the Differential Case (B).

Hyundai Palisade. Repair procedures

4.
The bearing cap (B) is mounted on the main body (A).
Tightening torque :
54.0 - 63.7 Nm (5.5 - 6.5 kgf.m, 39.8 - 47.0 lb-ft)
5.
Using the feeler gage, measure the gap between the main body (A) and bearing cap (B). And then select the inner bearing adjustment shim.

Hyundai Palisade. Repair procedures

6.
Install the selected inner bearing (A) adjustment shim.

Hyundai Palisade. Repair procedures

Inner bearing adjustment shim
Part NO.
Thickness
inch
53040-3C138
1.38
0.054
53040-3C141
1.41
0.055
53040-3C144
1.44
0.057
53040-3C147
1.47
0.058
53040-3C150
1.5
0.059
53040-3C153
1.53
0.06
53040-3C156
1.56
0.061
53040-3C159
1.59
0.063
53040-3C162
1.62
0.064
53040-3C165
1.65
0.065
53040-3C168
1.68
0.066
53040-3C171
1.71
0.067
53040-3C174
1.74
0.068
53040-3C177
1.77
0.067

How to select the shim of correct thickness
Select the shim that satisfies the specified total preload and hypoid gear backlash.
Measure the pinion by rotating it at 60 rpm.
(Total preload = pinion preload + 2.0 - 7.0 kgf.m)
Hypoid gear backlash : 0.07 - 0.15 mm

Hyundai Palisade. Repair procedures

Rear differential carrier reassembly
1.
Using the SST (09430-4G500, 09231-H1100), install the inner pinion bearing outer race (A).

Hyundai Palisade. Repair procedures

2.
Using the SST (09430-4G700, 09231-H1100), install the outer pinion bearing outer race.

Hyundai Palisade. Repair procedures

3.
Using the SST 09530-2W100, 09231-H1100), install the left and right side oil seal.

Hyundai Palisade. Repair procedures

Hyundai Palisade. Repair procedures

4.
Using the round pipe (A), press in the pinion rear bearing (B).

Hyundai Palisade. Repair procedures

5.
Using the round pipe (A), press the front bearing (B).

Hyundai Palisade. Repair procedures

Hyundai Palisade. Repair procedures   
Must be use new spacer.
Be careful not to deflect the spacer (A) when mounting it.
Normal mounting
Abnormal mounting

Hyundai Palisade. Repair procedures

Hyundai Palisade. Repair procedures


6.
Install the front bearing (A).

Hyundai Palisade. Repair procedures

7.
Using the SST (09530-2W700, 09231-H1100), install the pinion oil seal.

Hyundai Palisade. Repair procedures

8.
Using the SST09430-4G200, 09530-2W400), intall the pinion lock nut (A).
Tightening torque :
215.7 - 490.3 N.m (22.0 - 50.0 kgf.m, 159.1 - 361.7 lb-ft)

Hyundai Palisade. Repair procedures

Hyundai Palisade. Repair procedures

9.
tighten the lock nut.
Standard :
90.2 - 179.5 N.m (9.2 - 18.3 kgf.m, 66.5 - 132.4 lb-ft)
Hyundai Palisade. Repair procedures   
Maintain the constant speed rotation (60rpm).

Hyundai Palisade. Repair procedures

Gear carrier assembly reassembly
1.
Using the SST (09430-4G600), install the front/rear bearing (A).

Hyundai Palisade. Repair procedures

Hyundai Palisade. Repair procedures

2.
Install the gear carrier and ring gear.
Tightening torque :
78.5 - 88.3 N.m (8.0 - 9.0 kgf.m, 57.9 - 65.1 lb-ft)
Hyundai Palisade. Repair procedures   
When tightening the seal bolt, please do it diagonal.

Hyundai Palisade. Repair procedures

3.
Install the left and right side bearing outer race (A) to the gear carrier.

Hyundai Palisade. Repair procedures

4.
Fix the left and right side bearing outer race (A) with both hands and install it on the differential case.

Hyundai Palisade. Repair procedures

5.
Insert the left and right adjustment spacer between the differential side bearing and carrier. And than install the baearing cap (A) with mark.
Tightening torque :
44.1 - 53.9 N.m (4.5 - 5.5 kgf.m, 32.5 - 39.8 lb-ft)

Hyundai Palisade. Repair procedures

Hyundai Palisade. Repair procedures

6.
Adjust the differential shim and confirm the standard of the backrash.
standard :
0.07 - 0.15 mm (0.002 - 0.006 inch)

Hyundai Palisade. Repair procedures

Hyundai Palisade. Repair procedures   
Thickness of the differential shim needs to be adjusted if backrass is small.
Reduce the thickness of the left side differential shim and enlarge the thickness of the right side differential shim as much as the reduced left side.
7.
Measures the freeroad.
Standard Pinion freeroad :
0.25 - 0.84 N.m (2.5 - 8.5 kgf.cm, 0.18 - 0.62 lb-ft)

Hyundai Palisade. Repair procedures

8.
Coat sealant (A) on the rear cover surface.
Sealant : LT #5060 equivalent
Hyundai Palisade. Repair procedures   
Remove the remaining sealant before coating.
Evenly coat the sealant 2-3 mm thick along the rear cover surface.

Hyundai Palisade. Repair procedures

9.
Install the differential rear cover (A).
Tightening torque :
39.2 - 49.0 N.m (4.0 - 5.0 kgf.cm, 28.9 - 36.2 lb-ft)

Hyundai Palisade. Repair procedures

10.
Install the pillar plug (A) and drain plug (B).
Pillar plug :
39.2 - 58.8 N.m (4.0 - 6.0 kgf.cm, 28.9 - 43.4 lb-ft)
Drain plug :
49.0 - 68.6 N.m (5.0 - 7.0 kgf.cm, 36.2 - 50.6 lb-ft)

Hyundai Palisade. Repair procedures

Hyundai Palisade. Repair procedures

11.
Reassemble the rear differential assembly to the vehicle and inject oil.
Oil type :
Hypoid gear oil API GL-5, SAE 75W/85
(SK HCT-5 GEAR OIL 75W/85 EQUIVALENT)
Oil capacity (L) : 0.70 ± 0.05

Hyundai Palisade. Repair procedures

Inspection
1.
After clearing, check for damage parts or abrasion. Follow the below method, if any are noticed.
Item
Identify
Gear set (drive pinion gear & drive gear)
The gear set must be replaced with a new one if the gear tooth is damaged (crack/pits/dents).
Bearing
The bearing must be replaced with a new one if the bearing roller or race is damaged (crack/pits/dents).
Oil seal
The oil seal must be replaced with a new one if disassembled.
Differential carrier
The carrier must be replaced with a new one if the inside of the carrier bearing is damaged (crack/pits/dents) or a crack is found inside/ouside.
Companion flange
The pinion oil seal must be replaced with a new one if the contact surface is damaged (crack/pits/dents).
Open type
Diff gear set
(Diff side gear & diff pinion gear)
The gear set must be replaced with a new one if the gear tooth or tooth surface is damaged (crack/pits/dents).
Diff washer
(Diff side gear washer & diff pinion gear washer)
The wahser must be replaced with a new one if the washer surface is damaged (crack/pits/dents).

2.
Check the tooth contact pattern.
Tooth contact
Contact state
Solution
Standard contact

Hyundai Palisade. Repair procedures


1. Heel contact

Hyundai Palisade. Repair procedures

Increase the thickness of the pinion height adjusting shim, and position the drive pinion closer to the center of the drive gear.
Also, for backlash adjustment, reposition the drive gear further from the drive pinion.

Hyundai Palisade. Repair procedures

2. Face contact

Hyundai Palisade. Repair procedures

3. Toe contact

Hyundai Palisade. Repair procedures

Decrease the thickness of the pinion height adjusting shim, and position the drive pinion further from the center of the drive gear.
Also, for backlash adjustment, reposition the drive gear closer to the drive pinion.

Hyundai Palisade. Repair procedures

4. Flank contact

Hyundai Palisade. Repair procedures


Hyundai Palisade. Repair procedures   
1)
Tooth contact pattern is a method for judging the result of the adjustmentof drive pinion height and final drive gear backlash. The adjustment of drivepinion height and final drive gear backlash should be repeated until the toothcontact patterns are similar to the standard tooth contact pattern.
2)
When you cannot obtain a correct pattern, the drive gear and drive pinionhave exceeded their limits. Both gears should be replaced as a set.

    Components and components location

    Components Location 1. Rear differential carrier assembly 2. Rear driveshaft assembly 3. Coupling Assembly 4...

    Suspension System

    ..

    Other information:

    Hyundai Palisade (LX2) 2020-2024 Service Manual: Tailgate Trim


    C..

    Hyundai Palisade (LX2) 2020-2024 Service Manual: Description and operation


    Description The SMART KEY system is a system that allows the user to access and operate a vehicle in a very convenient way. To access the vehicle, no traditional key or remote control unit is needed. The user carries a SMART KEY FOB which does not require any conscious actions by the user (e...

    Categories

    Do Not Install a Child Restraint in the Front Passenger's Seat

    Hyundai Palisade. in the Front Passenger's Seat

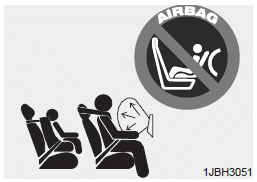
    Even though your vehicle is equipped with the OCS, never install a child restraint in the front passenger's seat. An inflating air bag can forcefully strike a child or child restraint resulting in serious or fatal injury.

    read more


    Copyright © 2024 www.hpalisadelx.com