Hyundai Palisade (LX2): Lighting System / Head Lamps
Repair procedures
| Removal |
Head lamps become very hot during use; do not touch them or any attaching
hardware immediately after they have been turned off.
|

The headlamp bulb should not be removed from the headlamp assembly until
just before a new bulb is installed.
Removing bulb for an extended period of time may affect headlamp bulb
performance.
Contaminants may enter the headlamp assembly where they can settle on
the lens and reflector.
Never turn on the head lamps with the bulb removed from the headlamp
assembly.
|

| 1. |
Disconnect the negative (-) battery terminal.
|
| 2. |
Remove the front bumper cover.
(Refer to Body - "Front Bumper Cover")
|
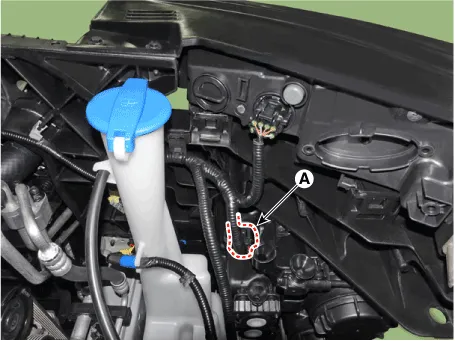
| 3. |
Disconnecting the lamp connectors (A).
|
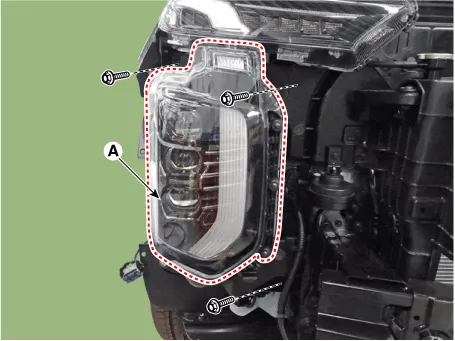
| 4. |
Loosen the mounting bolts and then remove the head lamp assembly (A).
|

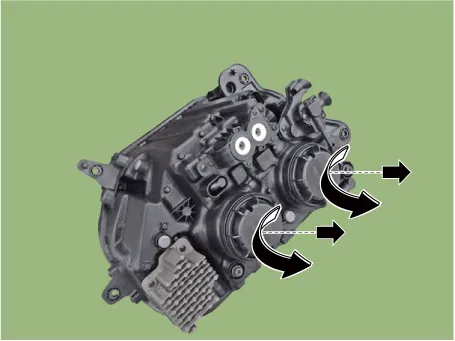
| 5. |
Remove the dust caps (A) from the headlamp assembly after turning in
the counterclockwise direction.
|
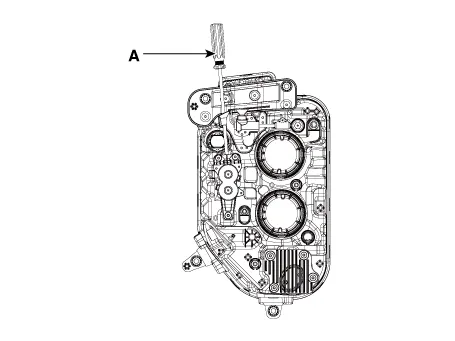
| 6. |
Disconnect the connector and then remove the bulb.
|
| Installation |
| 1. |
Install the head lamp bulb.
|
| 2. |
Install the dust cover.
|
| 3. |
Install the head lamp assembly after connecting the lamp connector.
|
| Head Lamp Aiming Instructions |
| 1. |
Alternately turn the adjusting gear to adjust the head lamp aiming.
If beam-setting equipment is not available, proceed as follows :
|
| 2. |
The vehicle should be placed on a flat ground.s
|
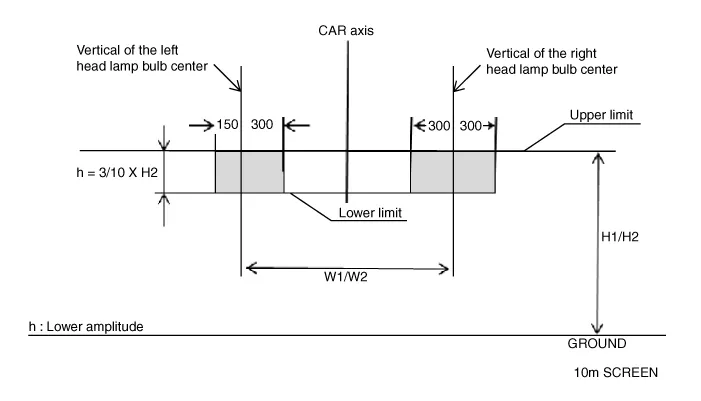
| 3. |
Draw vertical lines (Vertical lines passing through respective head
lamp centers) and a horizontal line (Horizontal line passing through
center of head lamps) on the screen.
|
| 4. |
With the head lamp and battery in normal condition, aim the head lamps
so the brightest portion falls on the horizontal and vertical lines.
A : Vertical (High beam / Low beam)
|
Head Lamp And Fog Lamp Aiming Point

| 1. |
Head Lamp (Low beam)
|
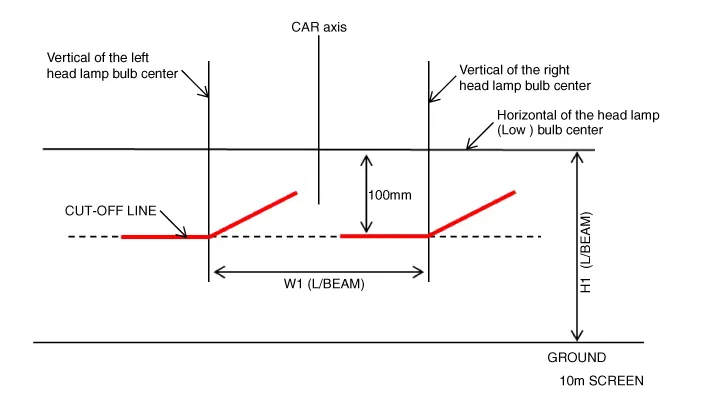
| 2. |
Head Lamp (High Beam)
|
| 3. |
With the front fog lamp turned on, adjust the cut-off line to be located
as shown in the picture below.
|

Head lamp fogging
Check the below instruction procedure when the head lamp is fogged.
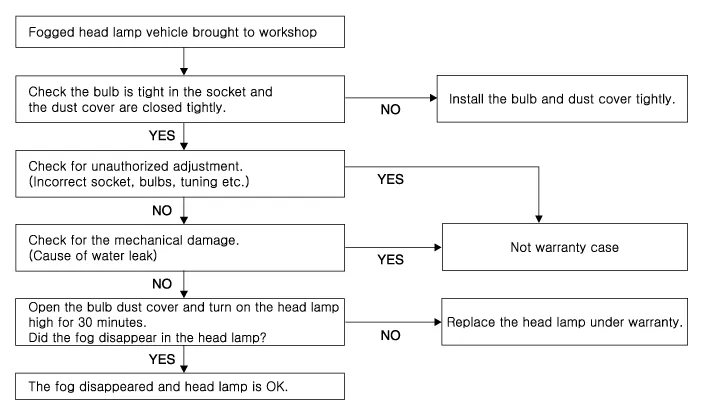
Component Location 1. Head lamp (Low) 2. Head lamp (High) 3. Head lamp (Spread Low) 4. Head lamp (Hot spot Low) 5.
Repair procedures Removal Door mirror turn signal lamp • Put on gloves to prevent hand injuries.
Other information:
Hyundai Palisade (LX2) 2020-2026 Service Manual: Specification
Hyundai Palisade (LX2) 2020-2026 Service Manual: Troubleshooting
Trouble Symptom Charts Trouble Symptom 1 Trouble Symptom 2 Trouble symptom Probable cause Remedy The set vehicle speed varies greatly upward or downward "Surging" (repeated alternating acceleration and deceleration) occurs after set
Categories
- Manuals Home
- Hyundai Palisade Owners Manual
- Hyundai Palisade Service Manual
- Electronic Child Safety Lock System
- Body (Interior and Exterior)
- Body Electrical System
- New on site
- Most important about car

Copyright © 2026 www.hpalisadelx.com - 0.017