Hyundai Palisade (LX2): Lubrication System / Engine Oil
Repair procedures
| Replacement |
|

|

| 1. |
Park the car on level ground.
|
| 2. |
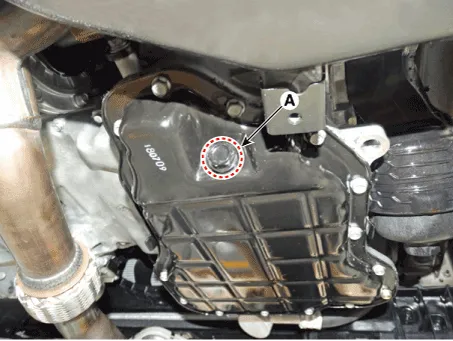
Drain engine oil.
|
| 3. |
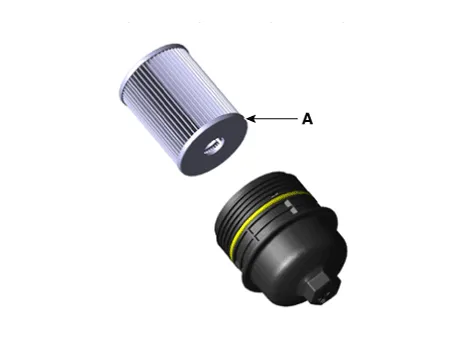
Replace the oil filter.
|


| 4. |
Fill new engine oil.
|


| 5. |
Start the engine and check that no oil is leaking from the drain plug
or oil filter.
|
| 6. |
Recheck the engine oil level.
|

| Inspection |
|

| 1. |
Warm up and stop the engine, and then wait for 5 minutes.
|
| 2. |
Turn the engine off and wait for a few minutes (about 5 minutes) for
the oil to return to the oil pan.
|
| 3. |
Pull the dipstick out, wipe and re-insert it fully.
|
| 4. |
Check that the oil level is between the "L" and "F" level marks on the
engine oil level gauge.
|
| 5. |
If the level is low, check for leakage and add oil up to the "F" level
mark.
|


| 1. |
Check engine oil for white turbidity or heavy contamination.
|
| 2. |
If engine oil becomes turbid and white, it is highly probable that it
is contaminated with engine coolant.
Repair or replace damaged parts.
|
| – |
API SM, ILSAC GF-4 or above
|
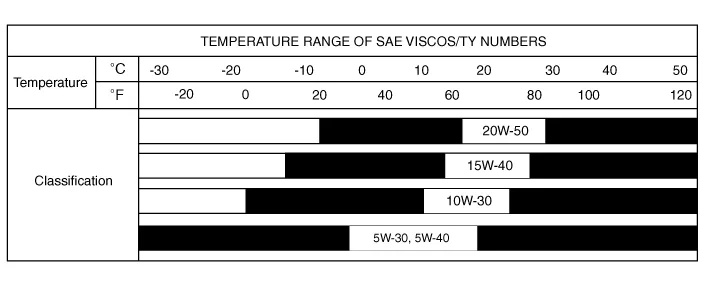
For best performance and maximum protection of all types of operation,
select only those lubricants which:
|

Engine oil flow diagram
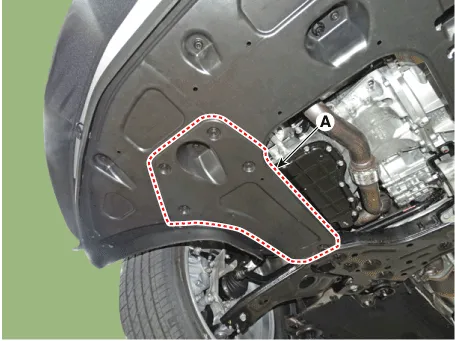
Components and components location Components 1. Oil fliter body 2. Gasket Repair procedures Removal • Be careful not to damage the parts located under the vehicle (floor under cover, fuel filter, fuel tank and canister) when raising the vehicle using the lift.
Other information:
Hyundai Palisade (LX2) 2020-2026 Service Manual: Smart Cruise Control (SCC) Switch
Components and components location Components 1. Remote control switch (Audio swtich) 2. Remote control switch (Cruise control switch) Schematic diagrams Circuit Diagram Trip + SCC Repair procedures Removal 1.
Hyundai Palisade (LX2) 2020-2026 Service Manual: Warning Indicator
Components and components location Components 1. Warning indicator 2. SVM camera Repair procedures Removal 1. Disconnect the negative (-) battery terminal. 2.
Categories
- Manuals Home
- Hyundai Palisade Owners Manual
- Hyundai Palisade Service Manual
- Power Outlet
- How to reset the power liftgate
- Removing and Storing the Spare Tire
- New on site
- Most important about car
