Hyundai Palisade (LX2): What to Do in an Emergency / Jump Starting
Jump starting can be dangerous if done incorrectly. Follow the jump starting procedure in this section to avoid serious injury or damage to your vehicle. If in doubt about how to properly jump start your vehicle, we strongly recommend that you have a service technician or towing service do it for you.
WARNING
To prevent SERIOUS INJURY or DEATH to you or bystanders, always follow these precautions when working near or handling the battery:
 Always read and follow
instructions carefully
when handling a battery.
Always read and follow
instructions carefully
when handling a battery.
 Wear eye protection
designed to protect the
eyes from acid splashes.
Wear eye protection
designed to protect the
eyes from acid splashes.
 Keep all flames, sparks,
or smoking materials
away from the battery.
Keep all flames, sparks,
or smoking materials
away from the battery.
 Hydrogen is always
present in battery cells,
is highly combustible,
and may explode if ignited.
Hydrogen is always
present in battery cells,
is highly combustible,
and may explode if ignited.
 Keep batteries out of
reach of children.
Keep batteries out of
reach of children.
 Batteries contain sulfuric
acid which is highly
corrosive. Do not allow
acid to contact your
eyes, skin or clothing.
Batteries contain sulfuric
acid which is highly
corrosive. Do not allow
acid to contact your
eyes, skin or clothing.
If acid gets into your eyes, flush your eyes with clean water for at least 15 minutes and get immediate medical attention. If acid gets on your skin, thoroughly wash the area. If you feel pain or a burning sensation, get medical attention immediately.
- When lifting a plastic-cased battery, excessive pressure on the case may cause battery acid to leak. Lift with a battery carrier or with your hands on opposite corners.
- Do not attempt to jump start your vehicle if your battery is frozen.
- NEVER attempt to recharge the battery when the vehicle's battery cables are connected to the battery.
- The electrical ignition system works with high voltage. NEVER touch these components with the engine running or when the ignition switch is in the ON position.
Information

An inappropriately disposed battery can be harmful to the environment and human health. Dispose of the battery according to your local law(s) or regulations.
NOTICE
To prevent damage to your vehicle:
- Only use a 12-volt power supply (battery or jumper system) to jump start your vehicle.
- Do not attempt to jump start your vehicle by push-starting.
Jump starting procedure
1.Position the vehicles close enough that the jumper cables will reach, but do not allow the vehicles to touch.
2.Avoid fans or any moving parts in the engine compartment at all times, even when the vehicles are turned off.
3. Turn off all electrical devices such as radios, lights, air conditioning, etc. Put the vehicles in P (Park) and set the parking brakes. Turn both vehicles OFF.
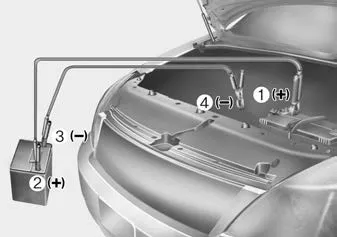
4. Connect the jumper cables in the exact sequence shown in the illustration. First connect one jumper cable to the red, positive (+) jumper terminal of your vehicle (1).
5. Connect the other end of the jumper cable to the red, positive (+) battery/jumper terminal of the assisting vehicle (2).
6. Connect the second jumper cable to the black, negative (-) battery/ chassis ground of the assisting vehicle (3).
7. Connect the other end of the second jumper cable to the black, negative (-) chassis ground of your vehicle (4).
Do not allow the jumper cables to contact anything except the correct battery or jumper terminals or the correct ground. Do not lean over the battery when making connections.
8. Start the engine of the assisting vehicle and let it run at approximately 2,000 rpm for a few minutes. Then start your vehicle.
9. Operate your vehicle for at least 30 minutes of driving or at least 60 minutes of engine running at idle before shutting off the engine. Without sufficient time to charge the battery, another no-start will occur.You can also visit your nearest dealer to request the battery be charged and tested.
If your vehicle will not start after a few attempts, it probably requires servicing. In this event please seek qualified assistance. If the cause of your battery discharging is not apparent, have your vehicle checked by an authorized HYUNDAI dealer.
Disconnect the jumper cables in the exact reverse order you connected them:
1. Disconnect the jumper cable from the black, negative (-) chassis ground of your vehicle (4).
2. Disconnect the other end of the jumper cable from the black, negative (-) battery/chassis ground of the assisting vehicle (3).
3. Disconnect the second jumper cable from the red, positive (+) battery/jumper terminal of the assisting vehicle (2).
4. Disconnect the other end of the jumper cable from the red, positive (+) jumper terminal of your vehicle (1).
If the Engine Doesn't Turn Over or Turns Over Slowly Be sure the shift button is in N (Neutral) or P (Park). The engine starts only when the shift button is in N (Neutral) or P (Park).
If your temperature gage indicates overheating, you experience a loss of power, or hear loud pinging or knocking, the engine may be overheating. If this happens, you should: 1.
Other information:
Hyundai Palisade (LX2) 2020-2026 Service Manual: PTC Heater (Diesel only)
Description and operation Description The PTC (Positive Temperature Coefficient) heater is installed at the exit or the backside of the heater core. The PTC heater is an electric heater using a PTC element as an auxiliary heating device that supplements deficiency of interior heat source in highly effective diesel engi
Hyundai Palisade (LX2) 2020-2026 Service Manual: Auto Defogging Actuator
Description and operation Description The auto defogging sensor is installed on the front window glass. The sensor judges and sends signal if moisture occurs to blow out wind for defogging. The air conditioner control module receives a signal from the sensor and restrains moisture and eliminates defog by the intake actuato
Categories
- Manuals Home
- Hyundai Palisade Owners Manual
- Hyundai Palisade Service Manual
- Power Outlet
- Engine Mechanical System
- Convenient Features of Your Vehicle
- New on site
- Most important about car
